> ## Documentation Index
> Fetch the complete documentation index at: https://docs.healthkeri.com/llms.txt
> Use this file to discover all available pages before exploring further.
# Quickstart
> Follow this tutorial to start signing everything.

 ## Overview
We've provided a Docker image and Docker compose files to get started configuring secure data exchange quickly.
**Note**: Please see [Software](/software) to get the necessary software for this tutorial.
## Overview
We've provided a Docker image and Docker compose files to get started configuring secure data exchange quickly.
**Note**: Please see [Software](/software) to get the necessary software for this tutorial.
1. [Launch healthKERI RACK and Mirth Connect](#1-launch-healthkeri-rack-and-mirth-connect).
2. [Create local identifiers with Locksmith](#2-create-local-identifiers-with-locksmith)
3. [Connect to RACK Gateways through Locksmith](#3-connect-to-rack-gateways-through-locksmith)
4. [Configure Outbound Route](#4-configure-outbound-route)
5. [Configure Inbound Route](#5-configure-inbound-route)
6. [Launch Routing](#6-launch-routing)
7. [Send Test Data](#7-send-test-data)
8. [Verify Results](#8-verify-results)
9. [Next Steps](#9-next-steps)
## 1. Launch healthKERI RACK and Mirth Connect
This tutorial will show you how to launch two RACK Gateways and configure them to sign and encrypt all data exchanged
between two Mirth Connect integration engine instances.
Mirth Connect is an open-source integration engine designed for data exchange in the healthcare industry. It enables
communication between disparate information systems by supporting various healthcare data exchange standards, namely, HL7 and FHIR
for text based patient health information, and DICOM for medical imaging transfer. Mirth Connect is intended to
facilitate the routing, transformation, and filtering of clinical data between different healthcare sectors and their
associated information systems. It is used to integrate data from hospitals, clinics, imaging centers,
laboratories, and pharmacies, and more. **For the purposes of this tutorial, Mirth Connect serves as a stand-in for any
given integration engine used in the healthcare sector**.
In the `rack-docker` repository there is a Docker compose file called `mirth-connect-rack-compose-sample.yaml` that can be used to launch two instances of RACK and two instances of Mirth Connect using the following command:
```bash Docker Compose theme={null}
docker compose -f ./examples/mirth-connect-rack-compose-sample.yaml up
```
In addition to the two instances of RACK and Mirth, this compose file also creates two temporary containers that create one
[channel](https://www.meditecs.com/kb/mirth-connect-channels-and-connectors/) on each Mirth Connect instance that are preconfigured to work with the RACK instances once this tutorial is complete.
After running the `docker compose` command above, the channels are created and started. The following output on your terminal window indicates that the all containers are operational and that you are ready to continue the tutorial:
```bash Dockere Compose theme={null}
mirth-cli-2-1 | Importing channel: /opt/connect/channels/mirth2-to-file-from-rack2-http.xml
mirth-cli-1-1 | Importing channel: /opt/connect/channels/mirth1-file-to-rack1-http.xml
mirth-cli-1-1 | Connected to Mirth Connect server @ https://172.31.0.2:8443 (4.5.0)
mirth-cli-1-1 | Executing statement: import "/opt/connect/channels/mirth1-file-to-rack1-http.xml"
mirth-cli-2-1 | Connected to Mirth Connect server @ https://172.31.0.3:8443 (4.5.0)
mirth-cli-2-1 | Executing statement: import "/opt/connect/channels/mirth2-to-file-from-rack2-http.xml"
mirth-cli-2-1 | Channel 'HTTP to JSON File' imported successfully.
mirth-cli-2-1 | Executing statement: deploy
mirth-cli-2-1 | Deploying Channels
mirth-cli-1-1 | Channel 'JSON File to HTTP' imported successfully.
mirth-cli-1-1 | Executing statement: deploy
mirth-cli-1-1 | Deploying Channels
mirth-cli-2-1 | No Channels to Deploy
mirth-cli-2-1 | Executing statement: channel enable *
mirth-cli-2-1 | Executing statement: channel start *
mirth-cli-1-1 | No Channels to Deploy
mirth-cli-1-1 | Executing statement: channel enable *
mirth-cli-2-1 | Disconnected from server.
mirth-cli-1-1 | Executing statement: channel start *
mirth-cli-1-1 | Disconnected from server.
mirth-cli-2-1 exited with code 0
mirth-cli-1-1 exited with code 0
```
The gateways launched in this tutorial were installing using the `--insecure` option. They should **only** be used for local testing and experimentation.
#### CESR Files and Out-Of-Band-Introductions
In order for RACK gateways to communicate with each other securely they need to be aware of each other's [key state](/essentials/overview#key-state) (the current set of signing keys to use for signature verification and encryption).
We accomplish this connection by exchanging each gateway's key event log in [CESR](https://trustoverip.github.io/tswg-cesr-specification/) encoded stream files in an Out-Of-Band-Introduction (OOBI). These files are exported during the `rack install` command that created the Docker images and must be exported from each docker container now running a RACK gateway.
To copy these CESR files out of docker containers, use the following commands:
```bash Docker theme={null}
docker cp examples-rack-1-1:/opt/rack/data/Rack1-core.cesr ./rack-1.cesr
docker cp examples-rack-2-1:/opt/rack/data/Rack2-core.cesr ./rack-2.cesr
```
We will be using these CESR files later in the tutorial.
## 2. Create local identifiers with Locksmith
Our local KERI wallet and secure ESSR proxy is called [Locksmith](/software#download-and-install).
You will use **Locksmith** for the rest of this tutorial to establish secure connections to the RACK gateways' Administration User Interfaces (AUIs).
The first step is using Locksmith is to create and open a **Vault** that will hold the Identifiers used for the remainder of this tutorial.
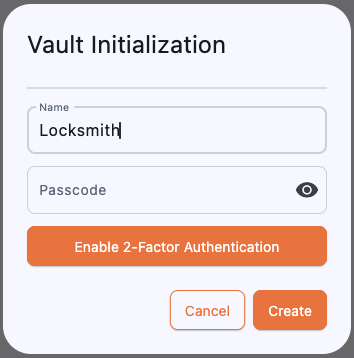
After launching **Locksmith** for the first time, you will be presented with the Vaults menu, on top of which you will find the **Initialize new vault** button.
 Select this button and create a new vault named "Locksmith":
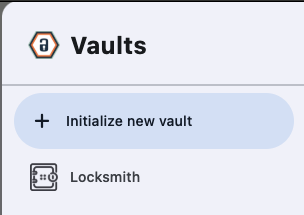
 After creating the Vault, you open it by clicking the drawer icon in the upper right corner of the Locksmith window and selecting the newly created vault:
 Now, let's create your first Identifier. The RACK gateways were installed into the Docker images with predetermined cryptographic salts for both the AUI identifier as well as the identifier that is authorized to access the AUI.
To connect to the RACK gateways, you must create a local identifier with the same salt that each gateway was initialized with.
That salt is `DQ7Hzp4faFdbesNx-_a1v`.
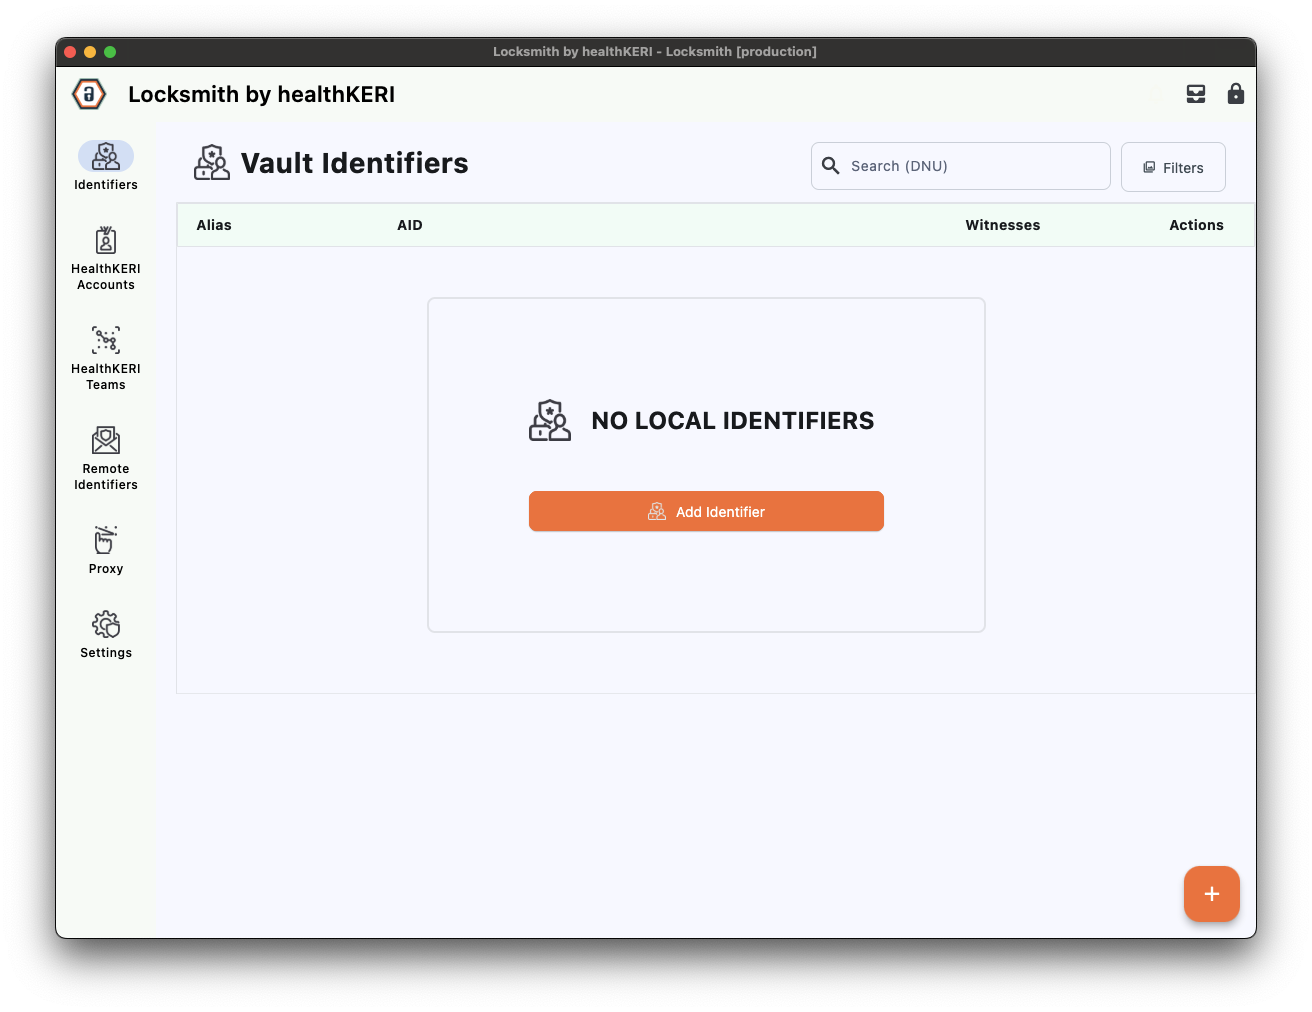
From the Identifiers screen, select the **Add Identifier** button to create your first identifier:
Now, let's create your first Identifier. The RACK gateways were installed into the Docker images with predetermined cryptographic salts for both the AUI identifier as well as the identifier that is authorized to access the AUI.
To connect to the RACK gateways, you must create a local identifier with the same salt that each gateway was initialized with.
That salt is `DQ7Hzp4faFdbesNx-_a1v`.
From the Identifiers screen, select the **Add Identifier** button to create your first identifier:
 Set the name for the new Identifier as "admin", then click on **Advanced Configuration** and copy and paste the salt listed above into the **Salt** field. Click on the eye ball icon in the **Salt** field to confirm that you have pasted the correct value.
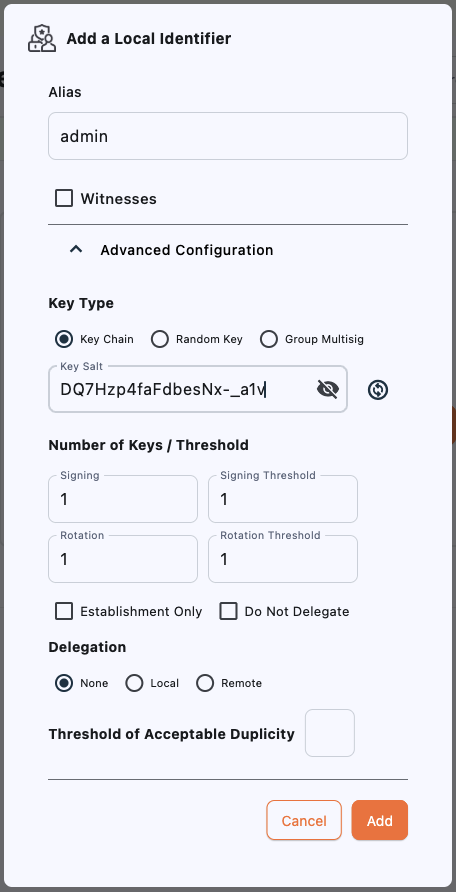 After you click **Add**, the new identifier appears in the grid with the name "admin" and the AID of `EK4iFDRWMPH2mJ_VSJZt5VgCTg7wupzKX5nipreSOBuR`.
It is important to use the name "admin" for this identifier since the name becomes part of the entropy used to create the first set of key pairs.
## 3. Connect to RACK Gateways through Locksmith
Your connection to the AUI for each RACK gateway is secured using the same KERI and ESSR technology at the heart of our gateways.
To establish a secure connection to each gateway you must load the CESR files copied from the running Docker containers in [Step 1](#1-launch-healthkeri-rack-and-mirth-connect).
Select **Remote Identifiers** from the menu on the left
After you click **Add**, the new identifier appears in the grid with the name "admin" and the AID of `EK4iFDRWMPH2mJ_VSJZt5VgCTg7wupzKX5nipreSOBuR`.
It is important to use the name "admin" for this identifier since the name becomes part of the entropy used to create the first set of key pairs.
## 3. Connect to RACK Gateways through Locksmith
Your connection to the AUI for each RACK gateway is secured using the same KERI and ESSR technology at the heart of our gateways.
To establish a secure connection to each gateway you must load the CESR files copied from the running Docker containers in [Step 1](#1-launch-healthkeri-rack-and-mirth-connect).
Select **Remote Identifiers** from the menu on the left
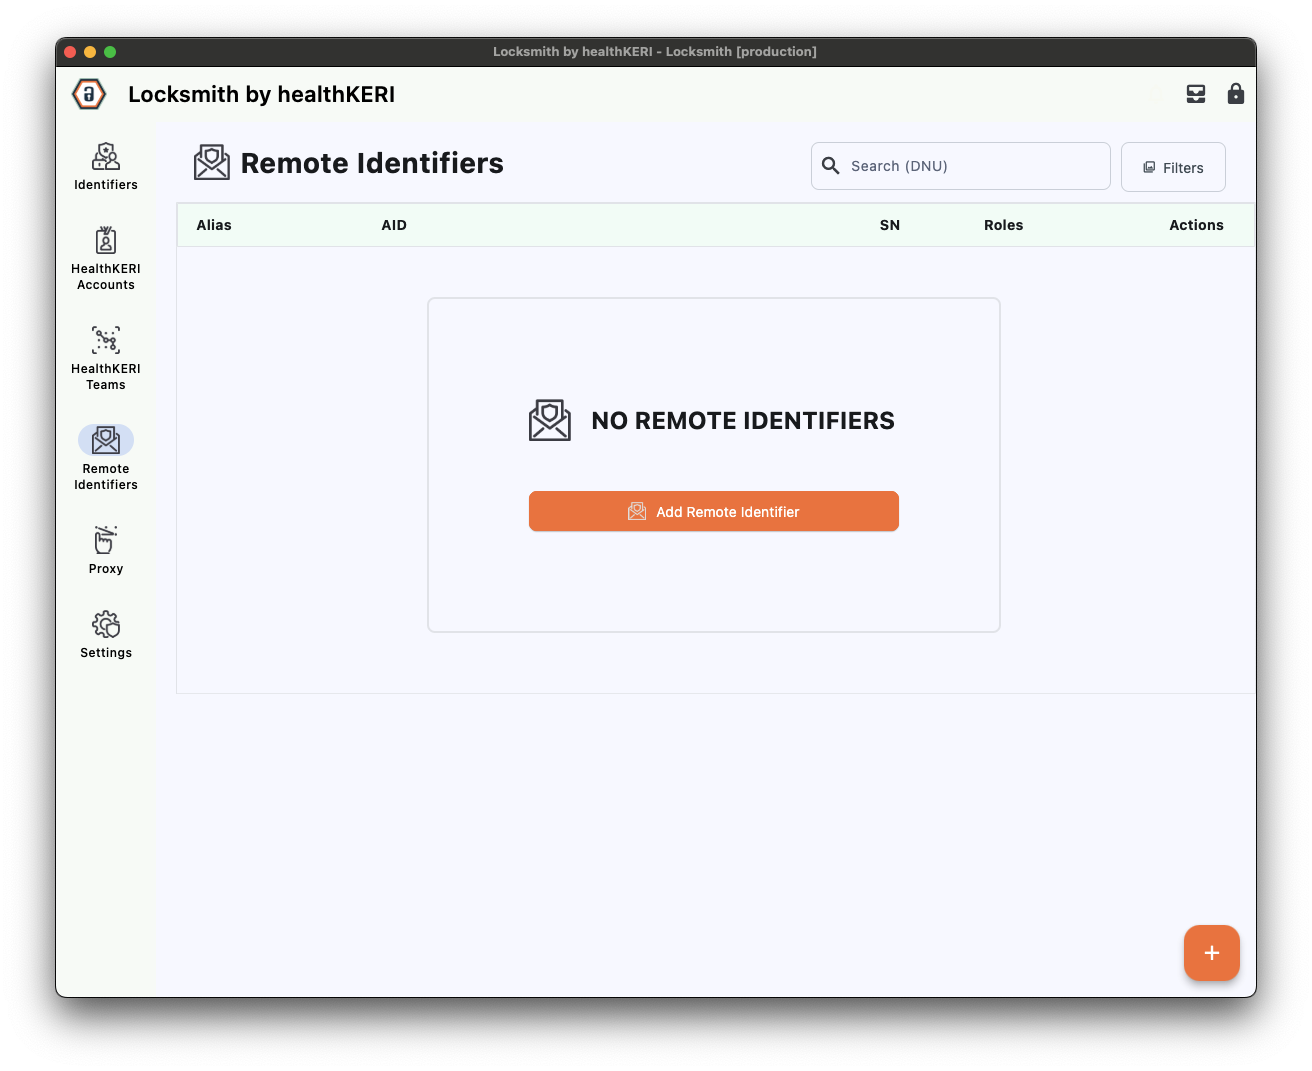 Click on **Add Remote Identifiers**. In the dialog that appears, set the **Alias** to "Rack1", then click the **File** radio button and **Browse** for the "rack-1.cesr" file exported from the Docker container earlier:
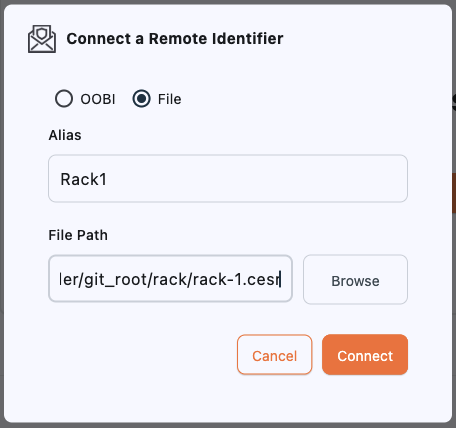 Repeat these steps to connect to the second gateway with an **Alias** of "Rack2 and the "rack-2.cesr" file.
Once complete, you should have the following 2 Remote Identifiers listed on the screen:
* Rack1 with an AID of `EPIa-VqM9y2EUUMAJ0MAv5AEdDVvaOcFmIxKn5jzIgKk`
* Rack2 with an AID of `EJ8Rx6lal6S7mlrhp6OuHkxAizP7N5ufzllu4YIbjjvV`.
Proxies are the final step required to launch the AUI screens for each gateway. Each proxy will sign and encrypt all communication from your web browser to the gateway and decrypt and verify all data retrieved from the remote gateway.
Repeat these steps to connect to the second gateway with an **Alias** of "Rack2 and the "rack-2.cesr" file.
Once complete, you should have the following 2 Remote Identifiers listed on the screen:
* Rack1 with an AID of `EPIa-VqM9y2EUUMAJ0MAv5AEdDVvaOcFmIxKn5jzIgKk`
* Rack2 with an AID of `EJ8Rx6lal6S7mlrhp6OuHkxAizP7N5ufzllu4YIbjjvV`.
Proxies are the final step required to launch the AUI screens for each gateway. Each proxy will sign and encrypt all communication from your web browser to the gateway and decrypt and verify all data retrieved from the remote gateway.
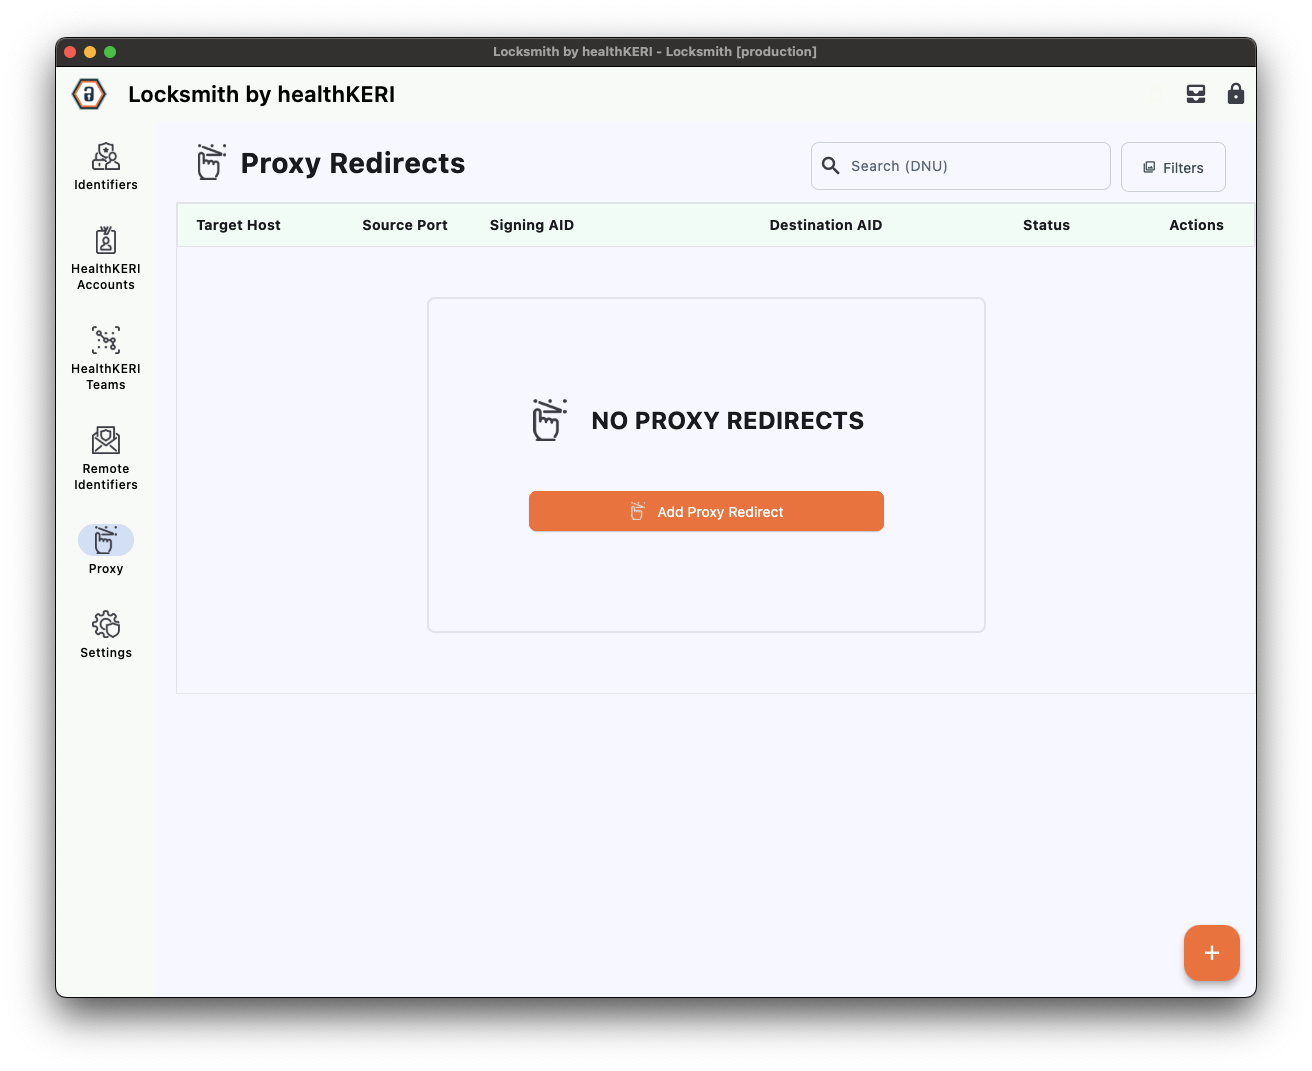 Select **Proxy** from the menu on the left, then click the **Add Proxy Redirect** button to create a proxy. Select "admin" from the **Associated Local AID** dropdown to use the identifier created in [Step 2](#2-create-local-identifiers-with-locksmith), then select Rack1 in the **Destination Remote AID** dropdown.
The **Target URL** and **Target Port** fields should populate automatically.
Select **Proxy** from the menu on the left, then click the **Add Proxy Redirect** button to create a proxy. Select "admin" from the **Associated Local AID** dropdown to use the identifier created in [Step 2](#2-create-local-identifiers-with-locksmith), then select Rack1 in the **Destination Remote AID** dropdown.
The **Target URL** and **Target Port** fields should populate automatically.
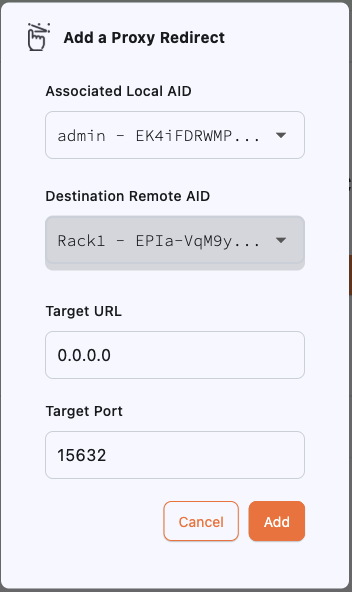 Repeat these steps to create a proxy to the second gateway by selecting "Rack2" from the **Destination Remote AID** dropdown.
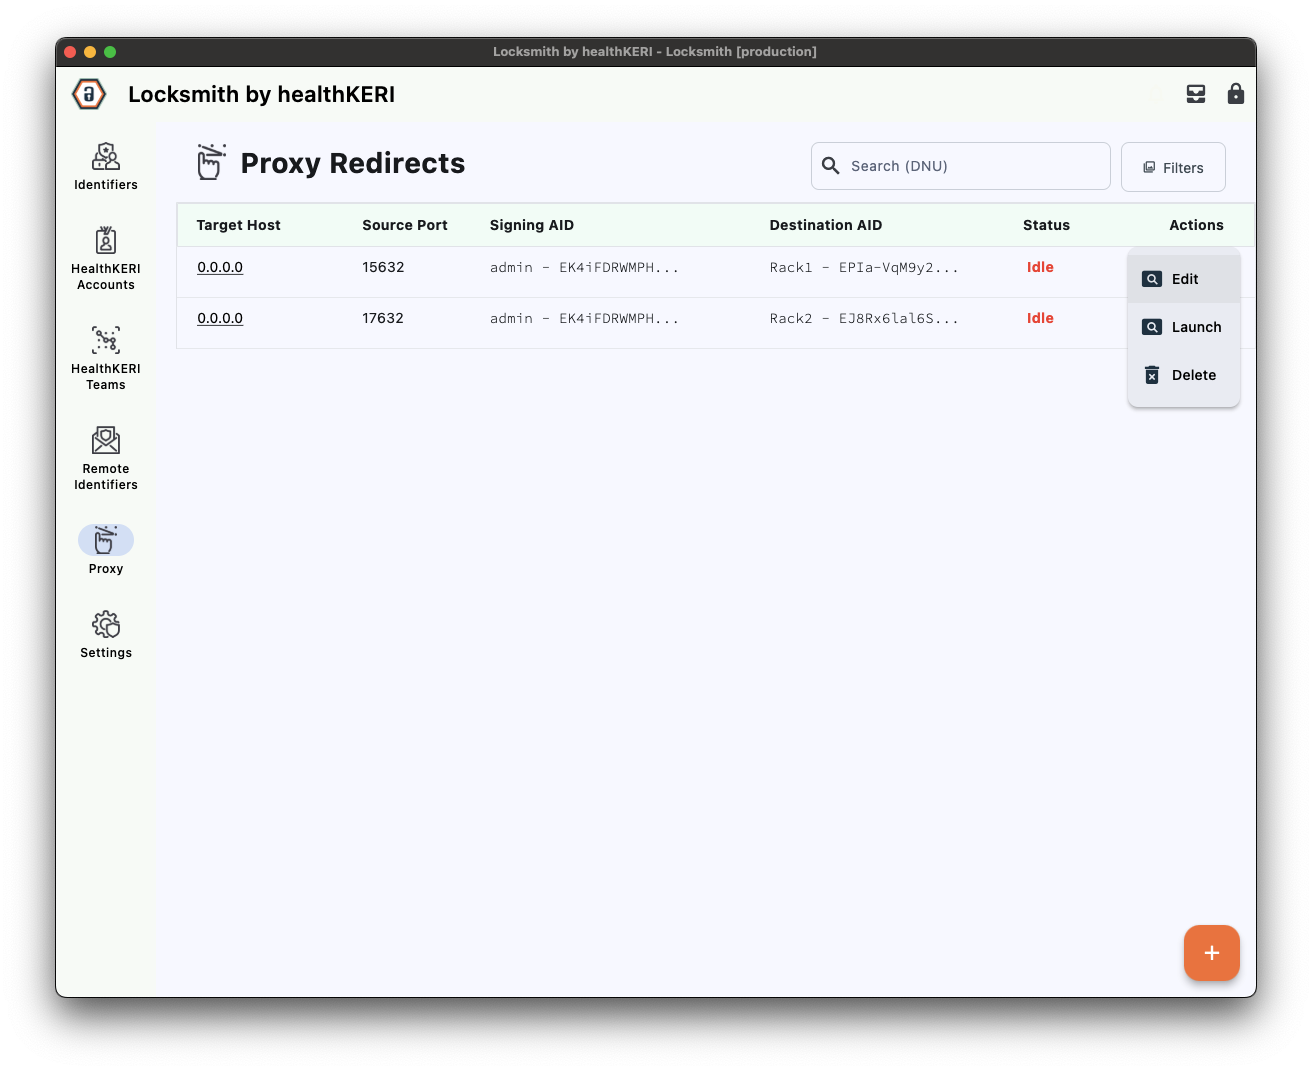
Once complete, you should have 2 Proxies listed on the screen with **Destination AIDs** Rack1 and Rack2. Both proxies should have the same **Signing AID**.
To launch the AUI for Rack1, select the **Actions** menu for its row in the grid and click on the **Launch** button. The status will change from **Idle** to **Running**.
Repeat this step to launch the AUI for Rack2.
Repeat these steps to create a proxy to the second gateway by selecting "Rack2" from the **Destination Remote AID** dropdown.
Once complete, you should have 2 Proxies listed on the screen with **Destination AIDs** Rack1 and Rack2. Both proxies should have the same **Signing AID**.
To launch the AUI for Rack1, select the **Actions** menu for its row in the grid and click on the **Launch** button. The status will change from **Idle** to **Running**.
Repeat this step to launch the AUI for Rack2.
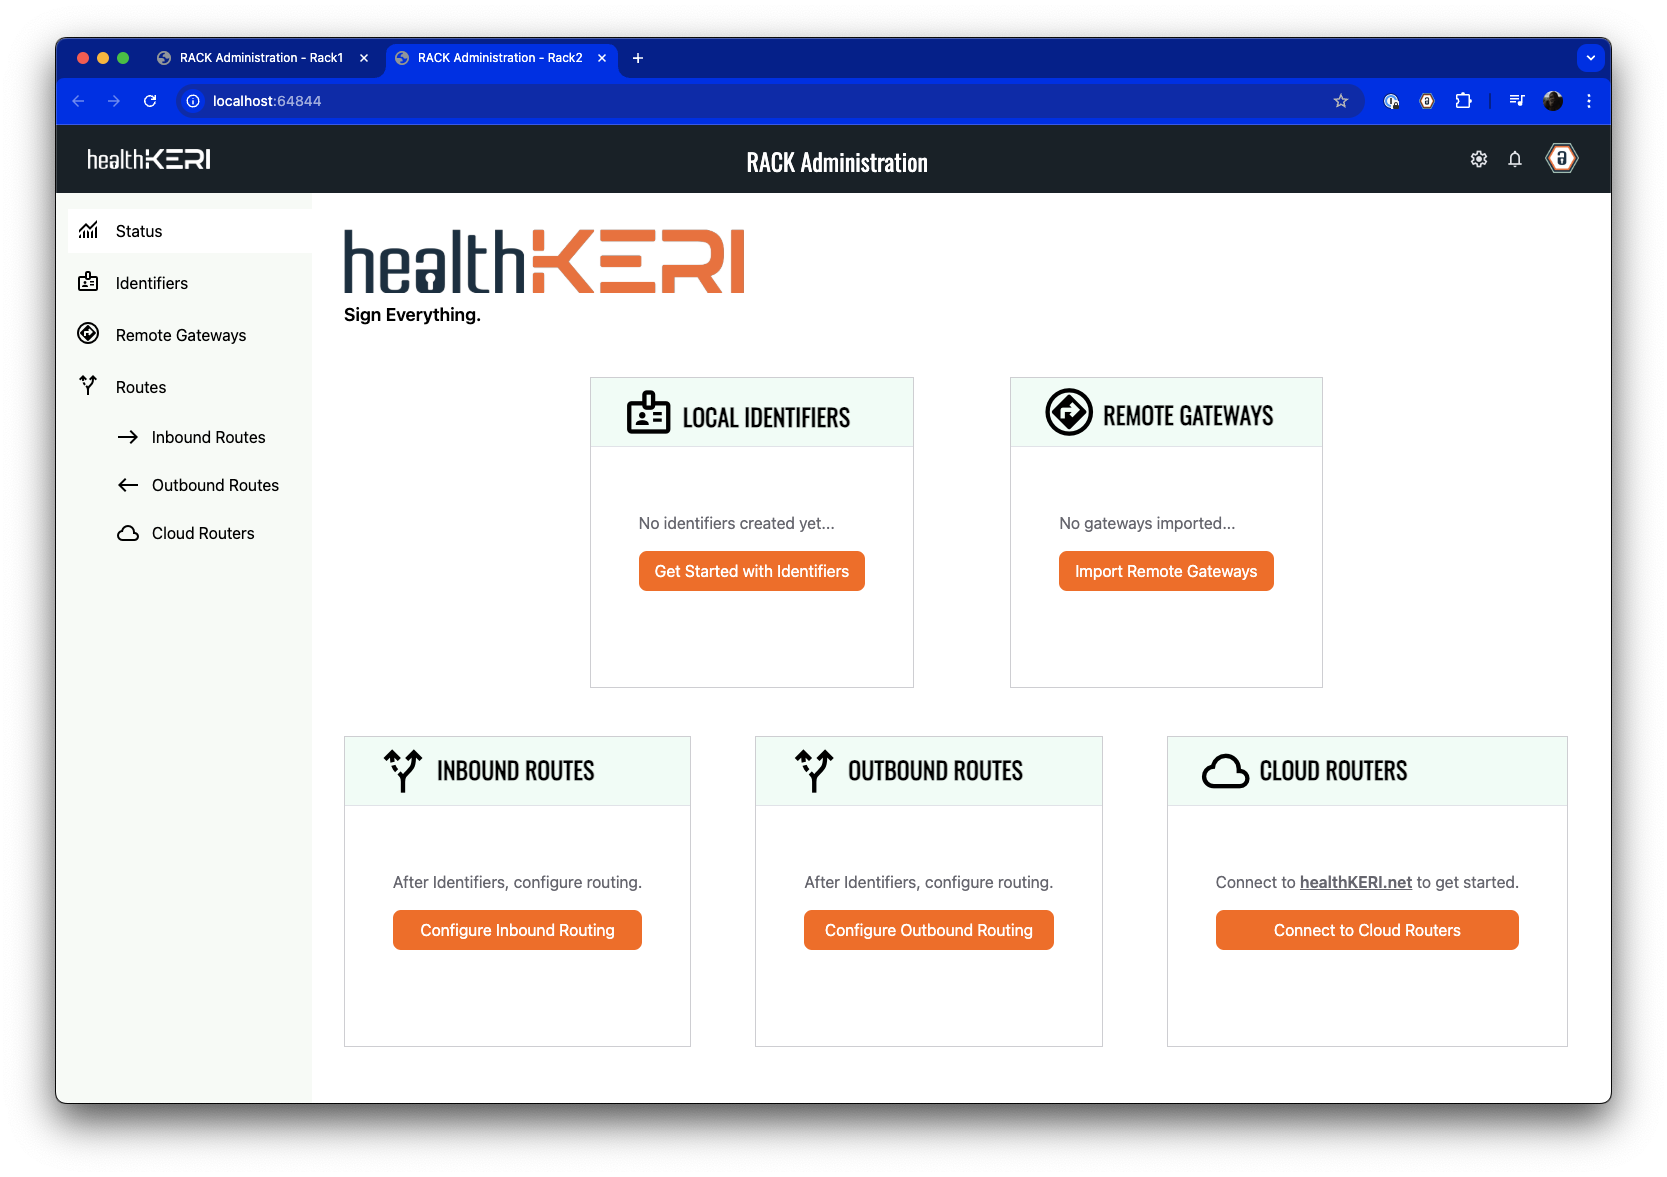
 Launching the proxies will open two browser windows, one for each RACK instance. The browsers will display the AUI for each gateway.
 ## 4. Configure Outbound Route
We will use the gateway named **Rack1** as our Outbound Route. The first pre-configured instance of Mirth, **Mirth1**, has a channel created to load any files placed in a certain directory and send them to the IP address of **Rack1** at port 3333.
We will now create an Outbound Route on **Rack1** that listens on port 3333 and signs, encrypts, and sends data to **Rack2**.
Select **Identifiers** from the menu on the left of the **Rack1** AUI:
## 4. Configure Outbound Route
We will use the gateway named **Rack1** as our Outbound Route. The first pre-configured instance of Mirth, **Mirth1**, has a channel created to load any files placed in a certain directory and send them to the IP address of **Rack1** at port 3333.
We will now create an Outbound Route on **Rack1** that listens on port 3333 and signs, encrypts, and sends data to **Rack2**.
Select **Identifiers** from the menu on the left of the **Rack1** AUI:
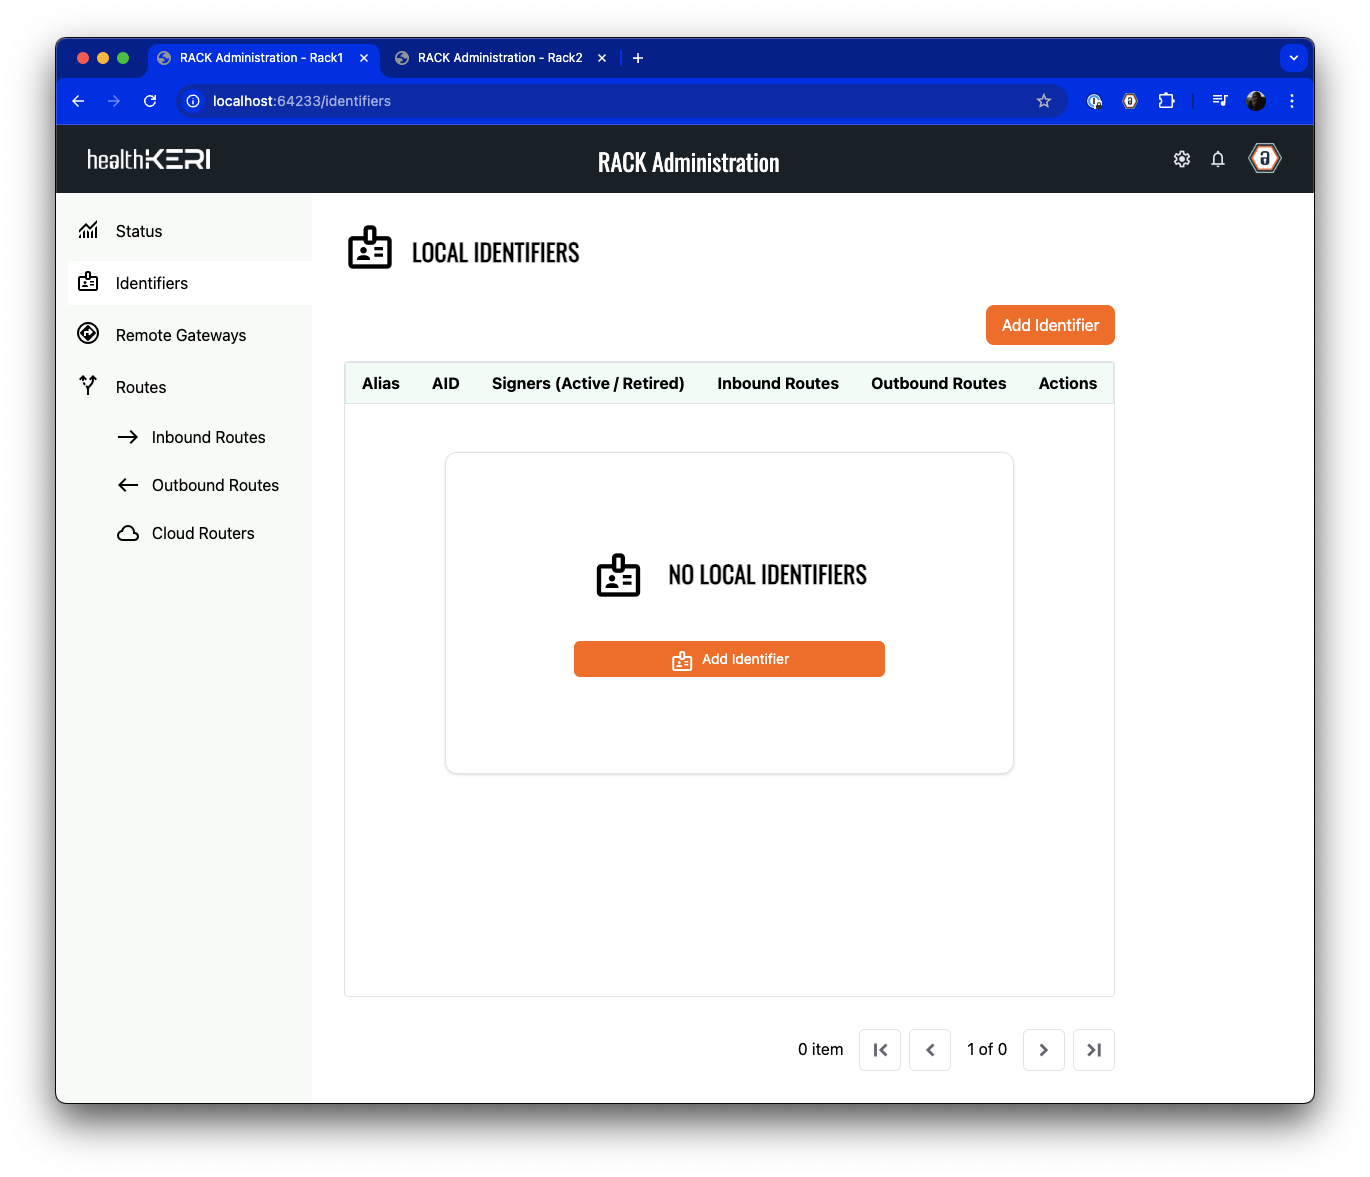 Click on **Add Identifier**. In the dialog that appears, give the identifier an **Alias** of "Rack1" and set the **Number of Signing Keys**, **Number of Rotation Keys**, **Signing Threshold** and **Rotation Threshold** to `1`:
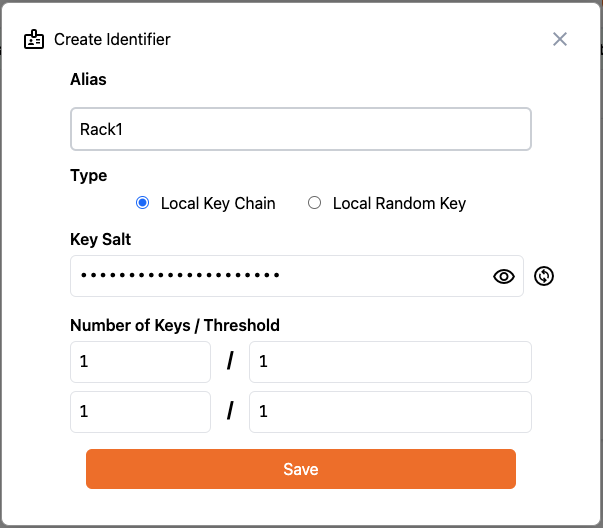 Click **Save** to create an Identifier that is local to this RACK gateway.
Now we will define the Outbound Route to the **Rack2** gateway. First select **Outbound Routes** from the menu on the left:
Click **Save** to create an Identifier that is local to this RACK gateway.
Now we will define the Outbound Route to the **Rack2** gateway. First select **Outbound Routes** from the menu on the left:
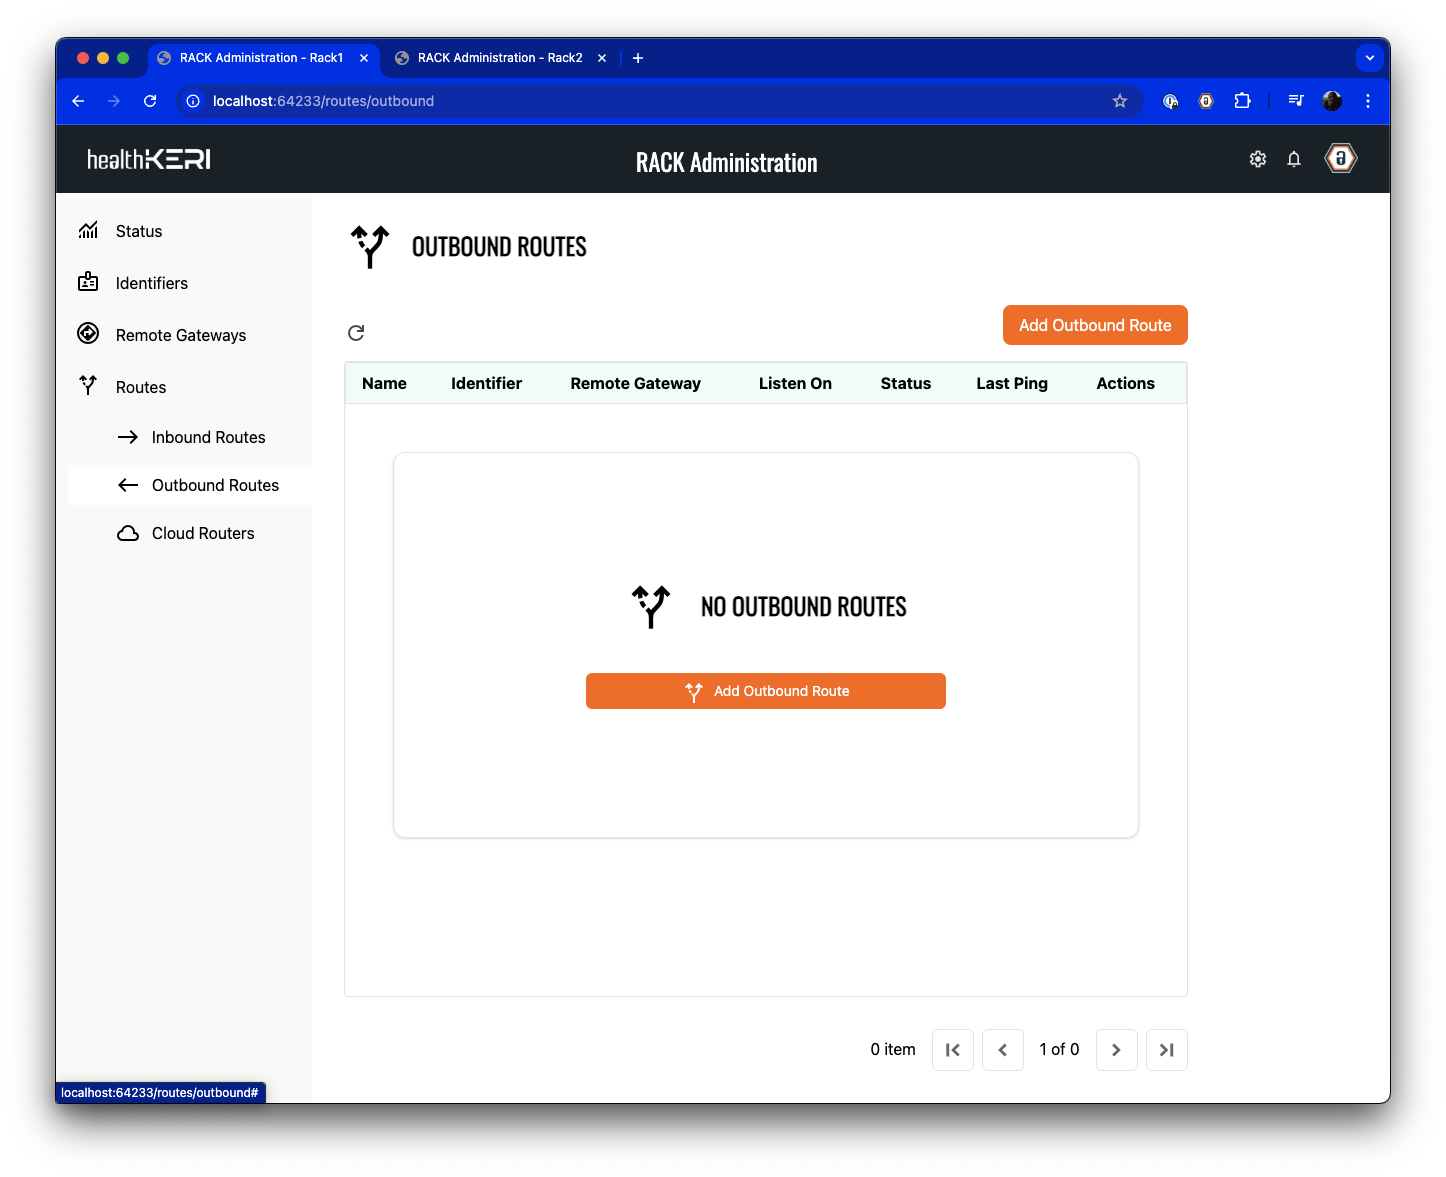 Click on the **Add Outbound Route** button to create the route.
Give the Outbound Route a **Name** of "To Rack2" (to indicate the data's destination).
Leave the **Peer-to-Peer** radio button selected, then select the "Rack1" Identifier you just created from the
**Local Identifier to Secure the Connection** dropdown. Leave the **Protocol** set to "HTTP" and set the **Local Port** to 3333.
Click on the **Add Outbound Route** button to create the route.
Give the Outbound Route a **Name** of "To Rack2" (to indicate the data's destination).
Leave the **Peer-to-Peer** radio button selected, then select the "Rack1" Identifier you just created from the
**Local Identifier to Secure the Connection** dropdown. Leave the **Protocol** set to "HTTP" and set the **Local Port** to 3333.
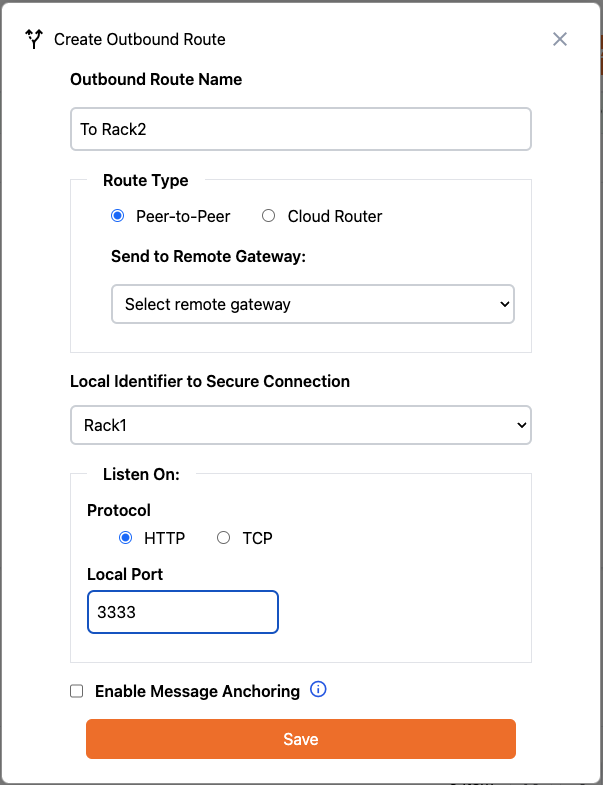 Click **Save** to create the Outbound Route to **Rack2**.
The two RACK gateways will be
connected to each other using the same CESR
file approach we used to connect Locksmith to each gateway. To establish this connection you will now export
an introduction to the Identifier you created for this
RACK gateway from the
**Outbound Route** grid.
We export introductions from the route grids so they also contain gateway connection information that allows them to be discovered by other gateways
Click **Save** to create the Outbound Route to **Rack2**.
The two RACK gateways will be
connected to each other using the same CESR
file approach we used to connect Locksmith to each gateway. To establish this connection you will now export
an introduction to the Identifier you created for this
RACK gateway from the
**Outbound Route** grid.
We export introductions from the route grids so they also contain gateway connection information that allows them to be discovered by other gateways
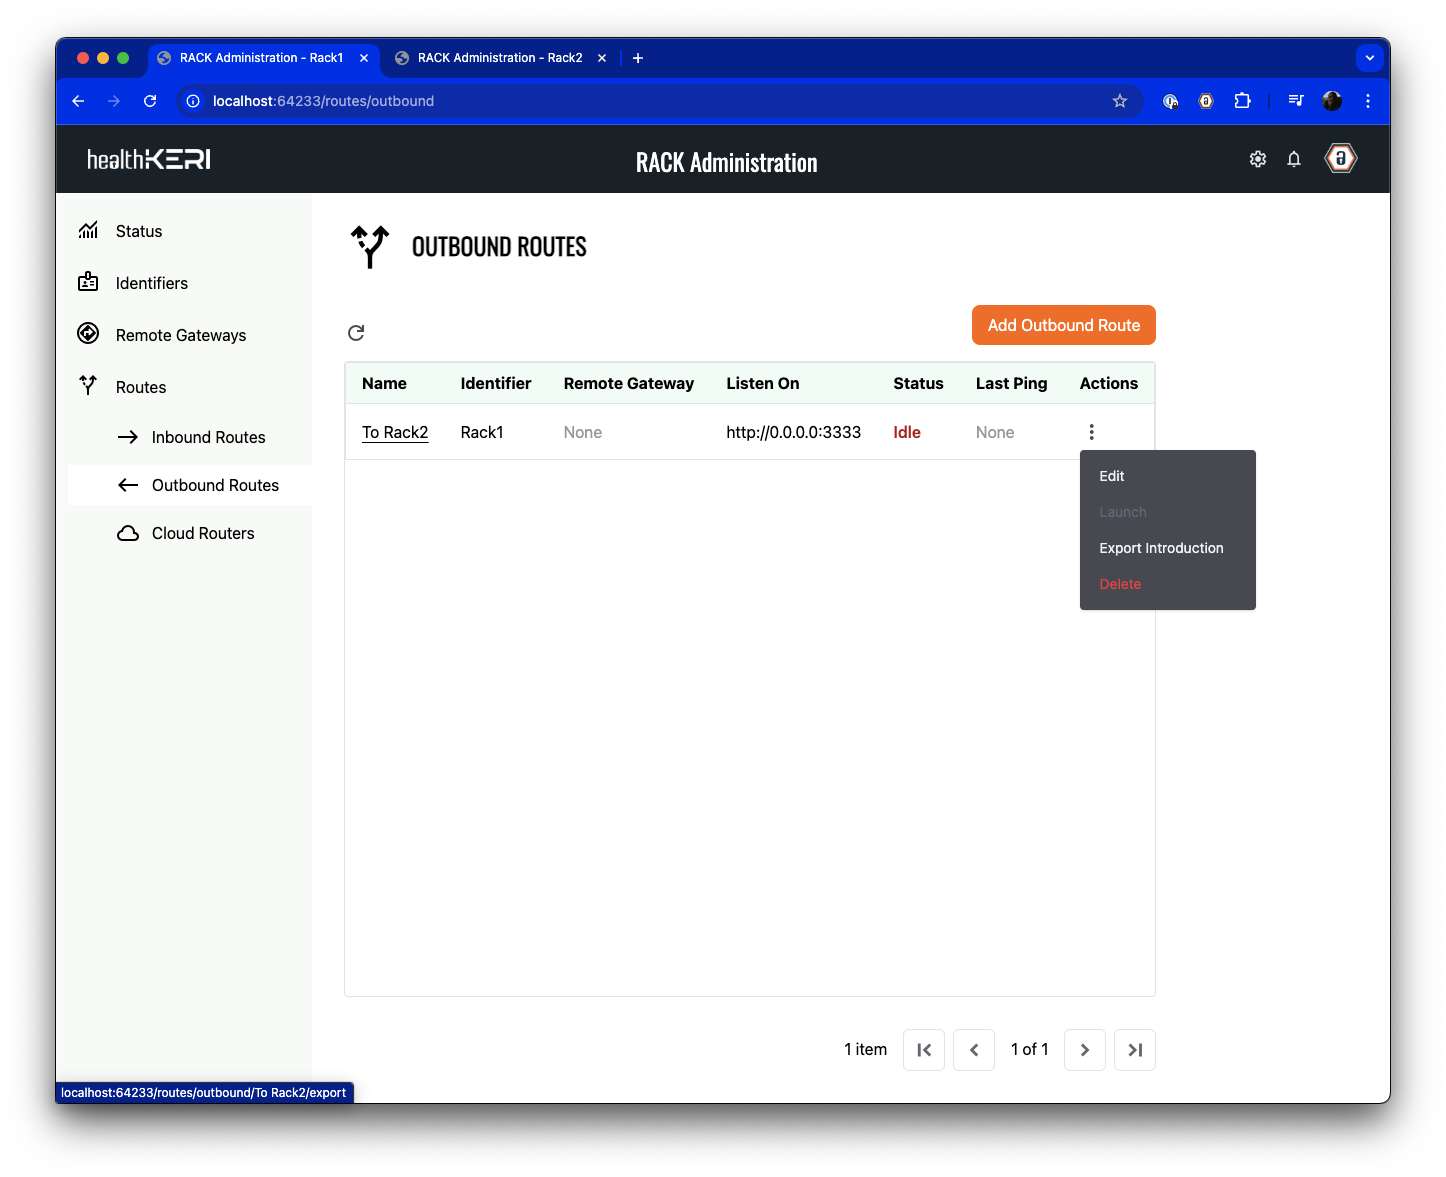 Open the **Actions** menu for the Outbound Route you just created and select the **Export Introduction** menu item.
A new file will be saved on your computer named "Rack1-To Rack2.cesr". We will use this file in the next step.
## 5. Configure Inbound Route
**Rack2** now becomes our inbound RACK gateway. The second pre-configured instance of Mirth, **Mirth2** has a channel created that is listening on port 5555 for inbound HTTP JSON files that it will write to a local directory.
In this step, we will create an Inbound Route on **Rack2** that listens on port 4444 for signed and encrypted data sent from **Rack1**. No other data will be accepted into this instance of RACK and therefore the **Mirth2** instance of Mirth Connect.
Ensure you are in the **Rack2** AUI browser window.
Navigate to the "Identifiers" screen in the **Rack2**
AUI. Click on **Add Identifier**.
In the dialog that appears, give the identifier an **Alias** of "Rack2" and set the **Number of Signing Keys**,
**Number of Rotation Keys**, **Signing Threshold** and **Rotation Threshold** to `1`:
Open the **Actions** menu for the Outbound Route you just created and select the **Export Introduction** menu item.
A new file will be saved on your computer named "Rack1-To Rack2.cesr". We will use this file in the next step.
## 5. Configure Inbound Route
**Rack2** now becomes our inbound RACK gateway. The second pre-configured instance of Mirth, **Mirth2** has a channel created that is listening on port 5555 for inbound HTTP JSON files that it will write to a local directory.
In this step, we will create an Inbound Route on **Rack2** that listens on port 4444 for signed and encrypted data sent from **Rack1**. No other data will be accepted into this instance of RACK and therefore the **Mirth2** instance of Mirth Connect.
Ensure you are in the **Rack2** AUI browser window.
Navigate to the "Identifiers" screen in the **Rack2**
AUI. Click on **Add Identifier**.
In the dialog that appears, give the identifier an **Alias** of "Rack2" and set the **Number of Signing Keys**,
**Number of Rotation Keys**, **Signing Threshold** and **Rotation Threshold** to `1`:
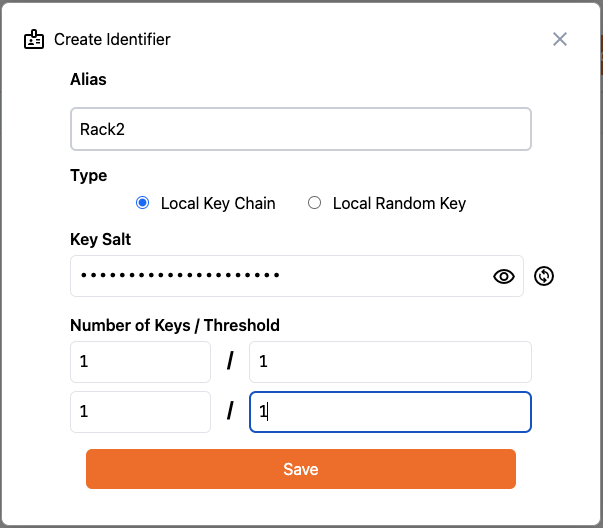 Click **Save** to create an Identifier that is local to this
RACK gateway.
Because we exported an introduction from **Rack1**, we are able to create a remote gateway on **Rack2** to use
during the creation of our **Inbound Route** in the next step.
Select **Remote Gateways** from the menu on the left:
Click **Save** to create an Identifier that is local to this
RACK gateway.
Because we exported an introduction from **Rack1**, we are able to create a remote gateway on **Rack2** to use
during the creation of our **Inbound Route** in the next step.
Select **Remote Gateways** from the menu on the left:
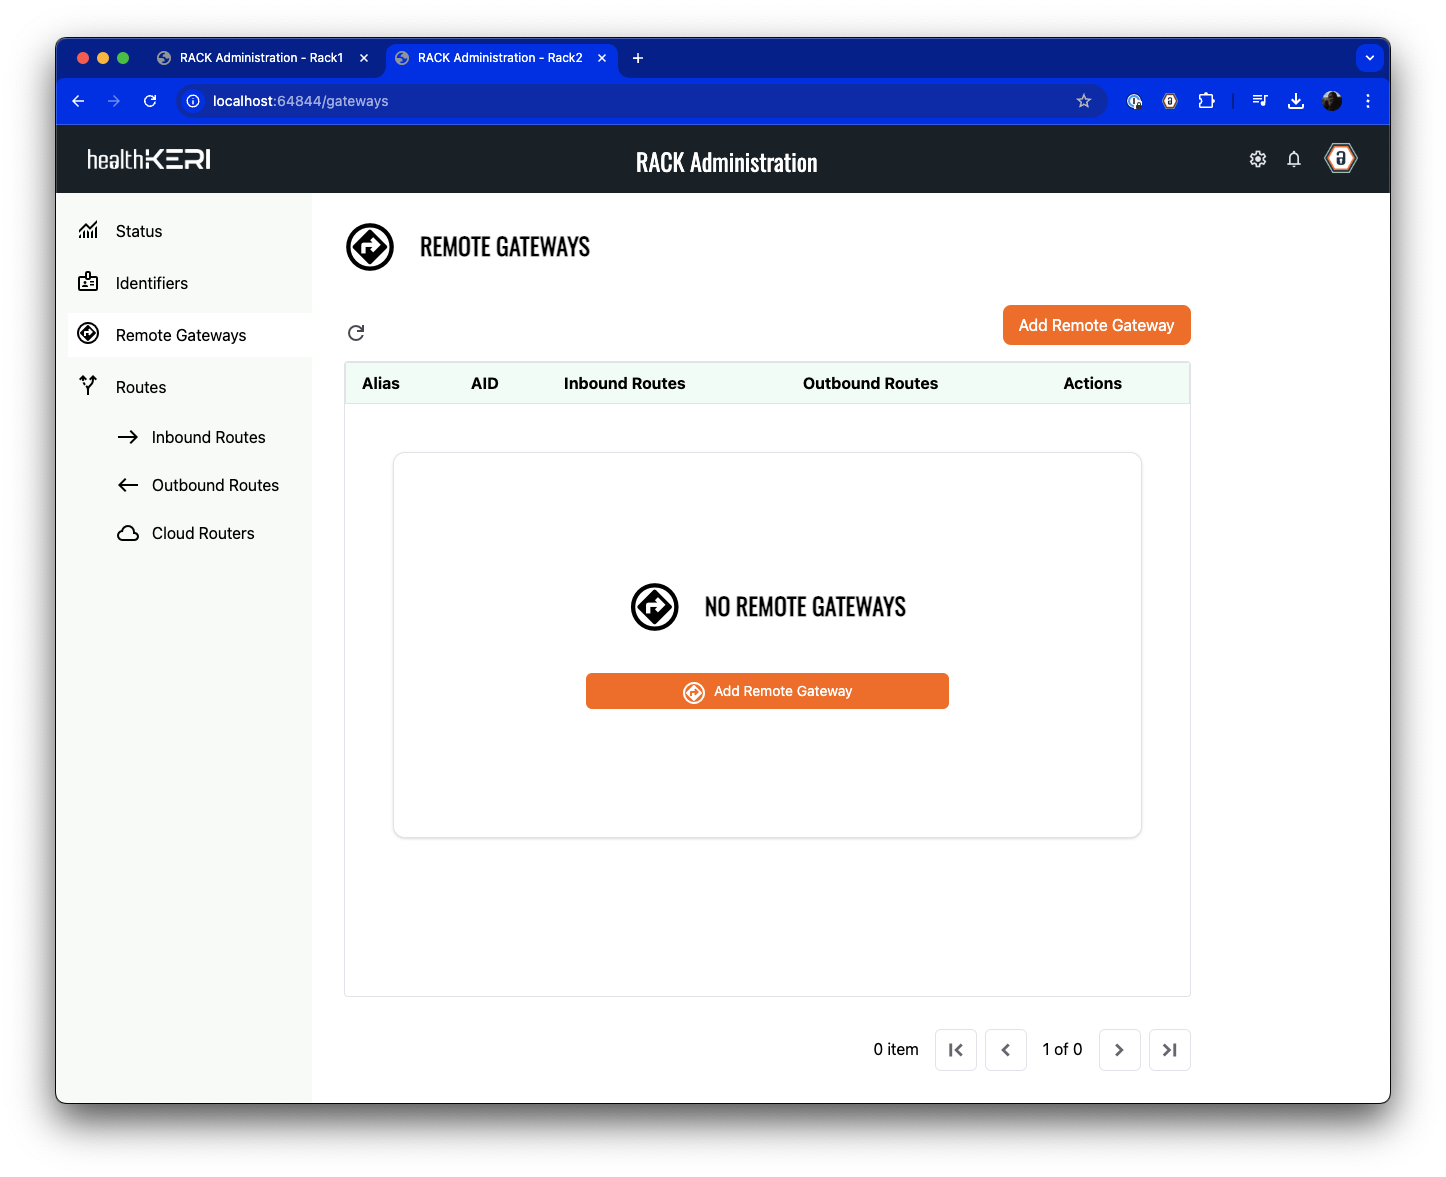 Click on **Add Remote Gateway**, set the **Alias** to "Rack1" and select the "Rack1-to Rack2.cesr" file exported from [Step 4.](#4-configure-outbound-route) above.
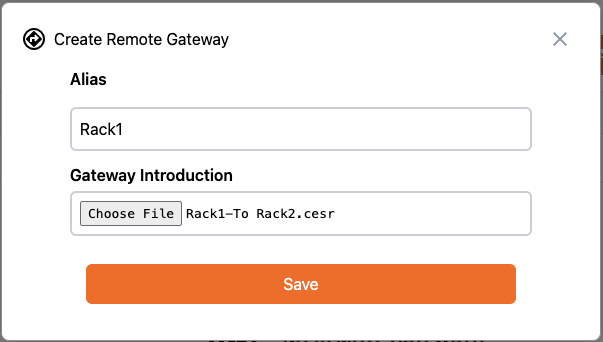 Click on **Save** to load the key state and connection information from **Rack1** into the **Rack2** gateway.
**Remember**: Everything in KERI is "End-to-End Verifiable". Each gateway verifies all key events and their signatures before accepting the key state into their own database.
Now we will define the Inbound Route from the **Rack1** gateway. First select **Inbound Routes** from the menu on the left:
Click on **Save** to load the key state and connection information from **Rack1** into the **Rack2** gateway.
**Remember**: Everything in KERI is "End-to-End Verifiable". Each gateway verifies all key events and their signatures before accepting the key state into their own database.
Now we will define the Inbound Route from the **Rack1** gateway. First select **Inbound Routes** from the menu on the left:
 Click on the **Add Inbound Route** button to create the route.
Give the Inbound Route a **Name** of "From Rack1" (to indicate the data's origin).
In the **Route Type** section, leave the **Peer-to-Peer** radio button selected, select the "Rack1" Identifier
you just imported from the **Accept from Remote Gateway** dropdown. Select "172.31.0.5" from the **IP address / Host Name**
dropdown and enter 4444 in the **Accept on Port** field.
In the **Forward To** section, leave the **Protocol** set to "HTTP", then set the destination **IP Address / Host Name**
to "172.31.0.3" and **Port** to 5555. That IP Address is the static IP address assigned to the **Mirth2** instance in the Docker compose file
(The channel created in **Mirth2** is set to listen for incoming HTTP connections on port 5555).
Click on the **Add Inbound Route** button to create the route.
Give the Inbound Route a **Name** of "From Rack1" (to indicate the data's origin).
In the **Route Type** section, leave the **Peer-to-Peer** radio button selected, select the "Rack1" Identifier
you just imported from the **Accept from Remote Gateway** dropdown. Select "172.31.0.5" from the **IP address / Host Name**
dropdown and enter 4444 in the **Accept on Port** field.
In the **Forward To** section, leave the **Protocol** set to "HTTP", then set the destination **IP Address / Host Name**
to "172.31.0.3" and **Port** to 5555. That IP Address is the static IP address assigned to the **Mirth2** instance in the Docker compose file
(The channel created in **Mirth2** is set to listen for incoming HTTP connections on port 5555).
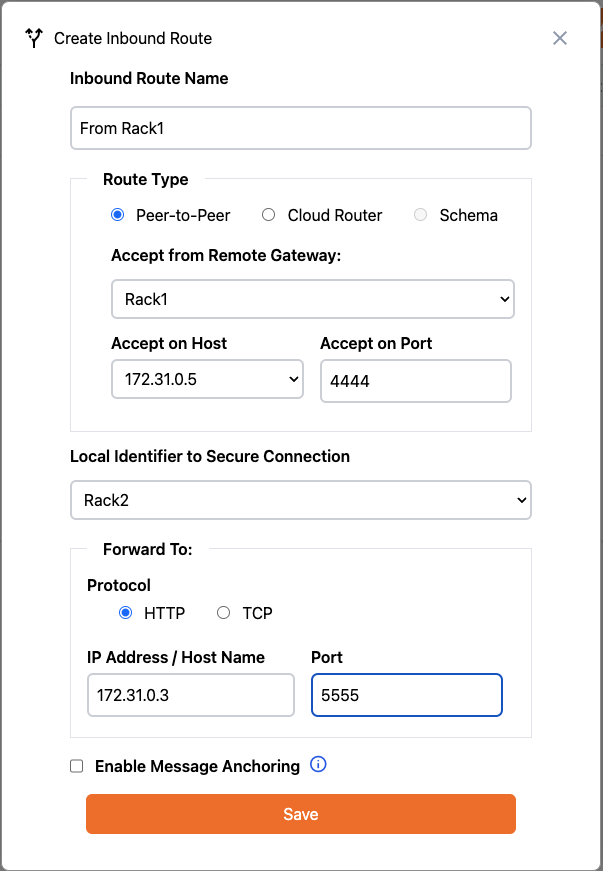 Click **Save** to create the Inbound Route from **Rack1**.
As we did with the Outbound Route on **Rack1** we must export the introduction to **Rack2**, but this time from the Inbound Route grid:
Click **Save** to create the Inbound Route from **Rack1**.
As we did with the Outbound Route on **Rack1** we must export the introduction to **Rack2**, but this time from the Inbound Route grid:
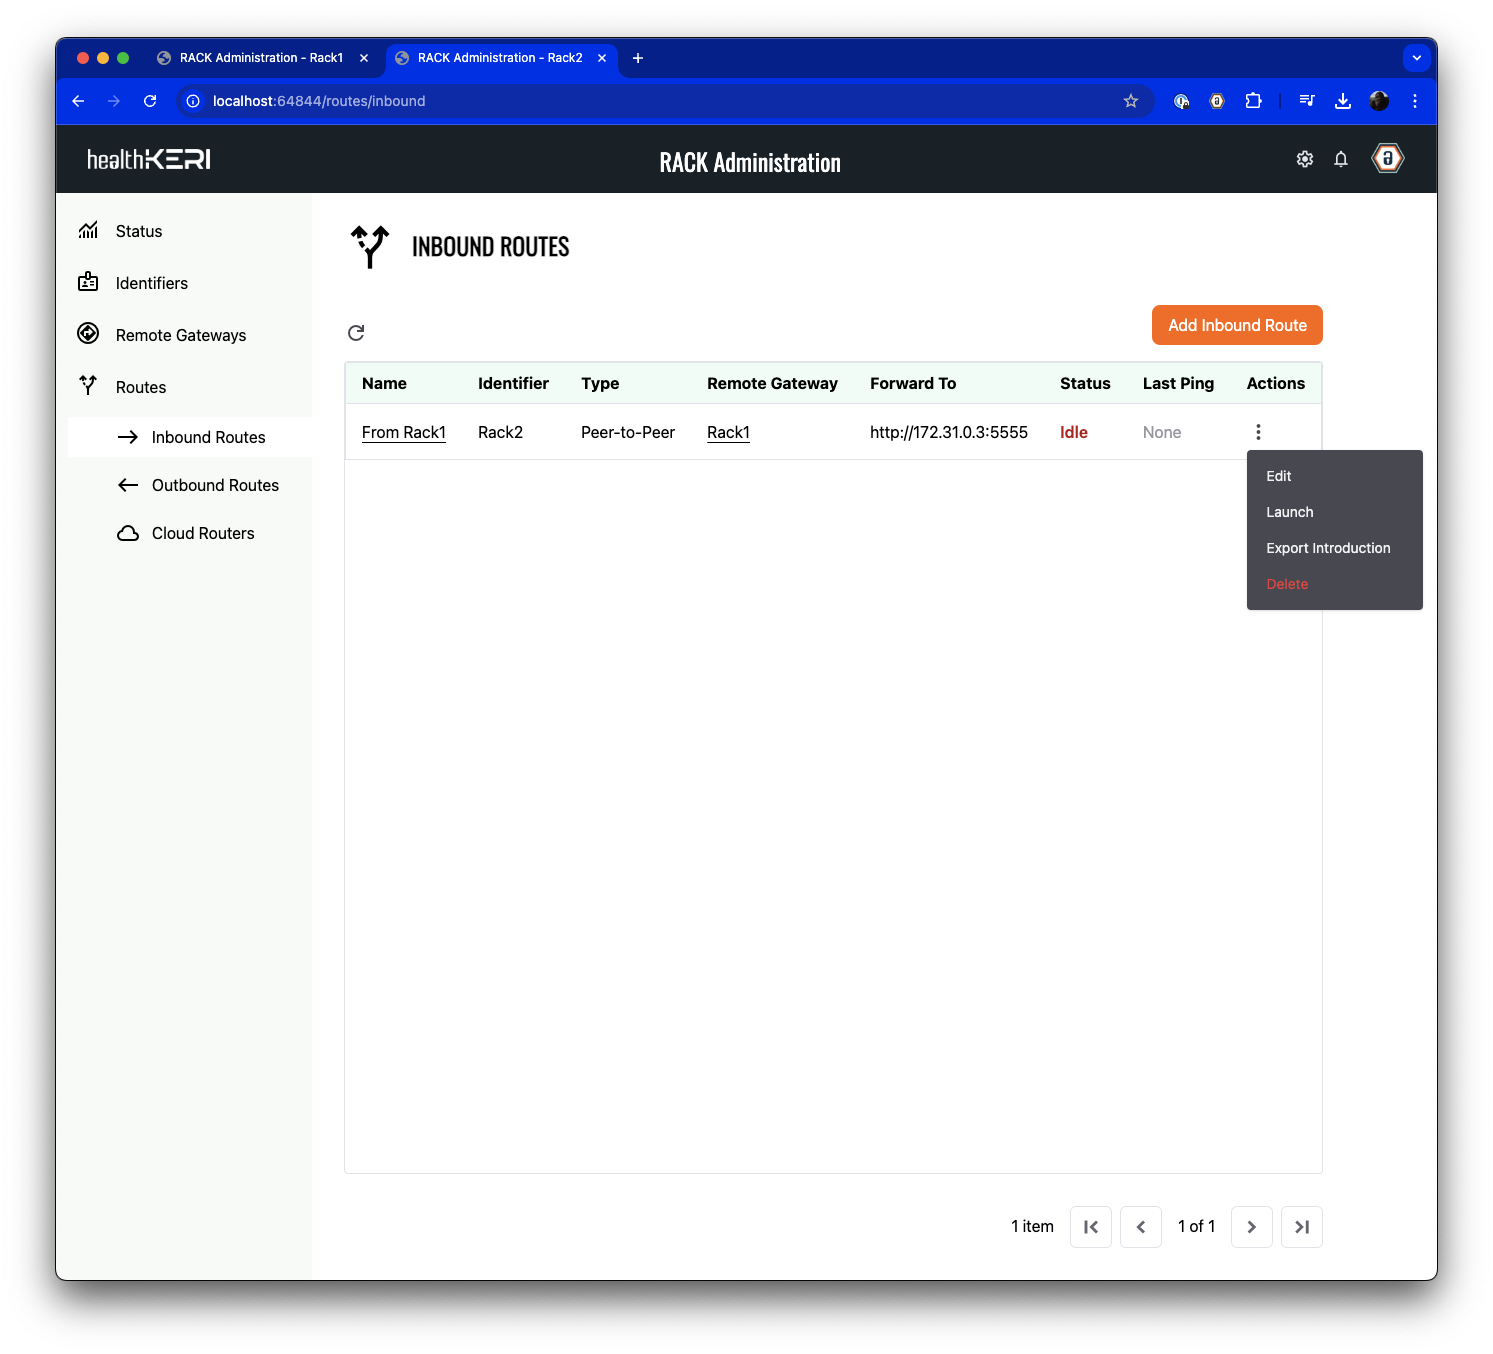 Open the **Actions** menu for the Inbound Route you just created and select the **Export Introduction** menu item. A new file will be saved on your computer named "Rack2-From Rack1.cesr". We will use this file in the [next step](#6-launch-routing).
## 6. Launch Routing
We will now complete the connection between the two gateways by loading the CESR file from **Rack2** into **Rack1** and updating the Outbound Route we created in [Step 4](#4-configure-outbound-route).
Ensure you are in the **Rack1** AUI browser window.
Navigate back to the **Remote Gateways** section of the **Rack1** AUI.
Click on **Add Remote Gateway**, then set an **Alias** of "Rack2" and select the "Rack2-From Rack1.cesr" file created in the last step:
Open the **Actions** menu for the Inbound Route you just created and select the **Export Introduction** menu item. A new file will be saved on your computer named "Rack2-From Rack1.cesr". We will use this file in the [next step](#6-launch-routing).
## 6. Launch Routing
We will now complete the connection between the two gateways by loading the CESR file from **Rack2** into **Rack1** and updating the Outbound Route we created in [Step 4](#4-configure-outbound-route).
Ensure you are in the **Rack1** AUI browser window.
Navigate back to the **Remote Gateways** section of the **Rack1** AUI.
Click on **Add Remote Gateway**, then set an **Alias** of "Rack2" and select the "Rack2-From Rack1.cesr" file created in the last step:
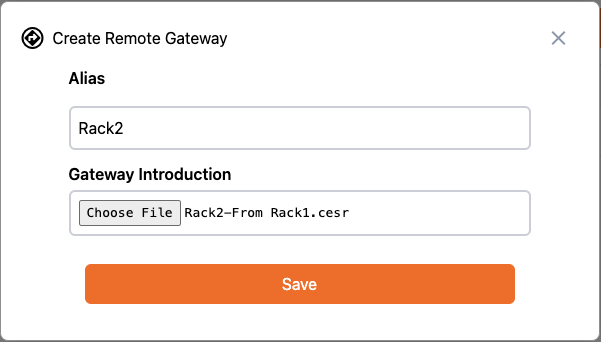 Click on **Save** to load the key state and connection information from **Rack2** into the **Rack1** gateway.
Because we created the Outbound Route first, we were not able to select the destination Remote Gateway.
Navigate to the **Outbound Routes** section of the **Rack1** AUI. Select **Edit** from the **Actions** menu of the
Outbound Route we created earlier and update **Send to Remote Gateway** to point to "Rack2"
Click on **Save** to load the key state and connection information from **Rack2** into the **Rack1** gateway.
Because we created the Outbound Route first, we were not able to select the destination Remote Gateway.
Navigate to the **Outbound Routes** section of the **Rack1** AUI. Select **Edit** from the **Actions** menu of the
Outbound Route we created earlier and update **Send to Remote Gateway** to point to "Rack2"
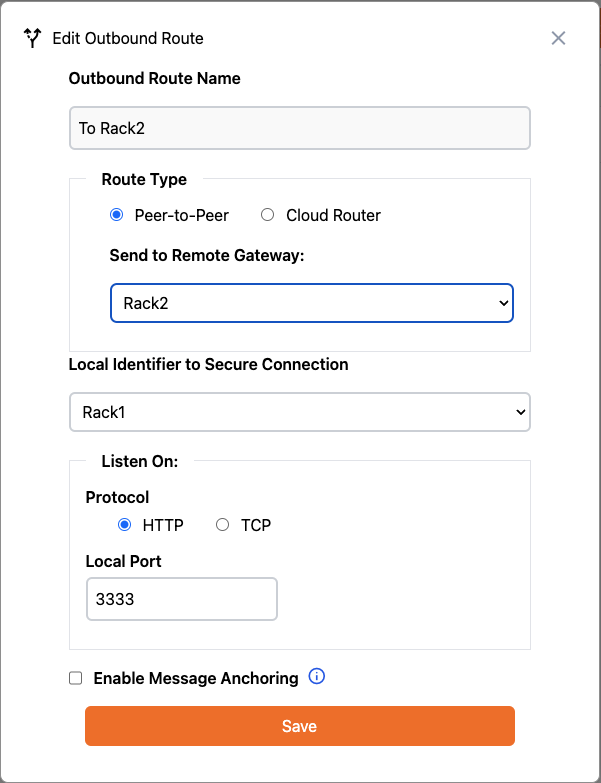 Click **Save** to complete the route configuration for both gateways.
Launch this route by selecting **Launch** from the **Actions** menu of the Outbound Route named "To Rack2":
Click **Save** to complete the route configuration for both gateways.
Launch this route by selecting **Launch** from the **Actions** menu of the Outbound Route named "To Rack2":
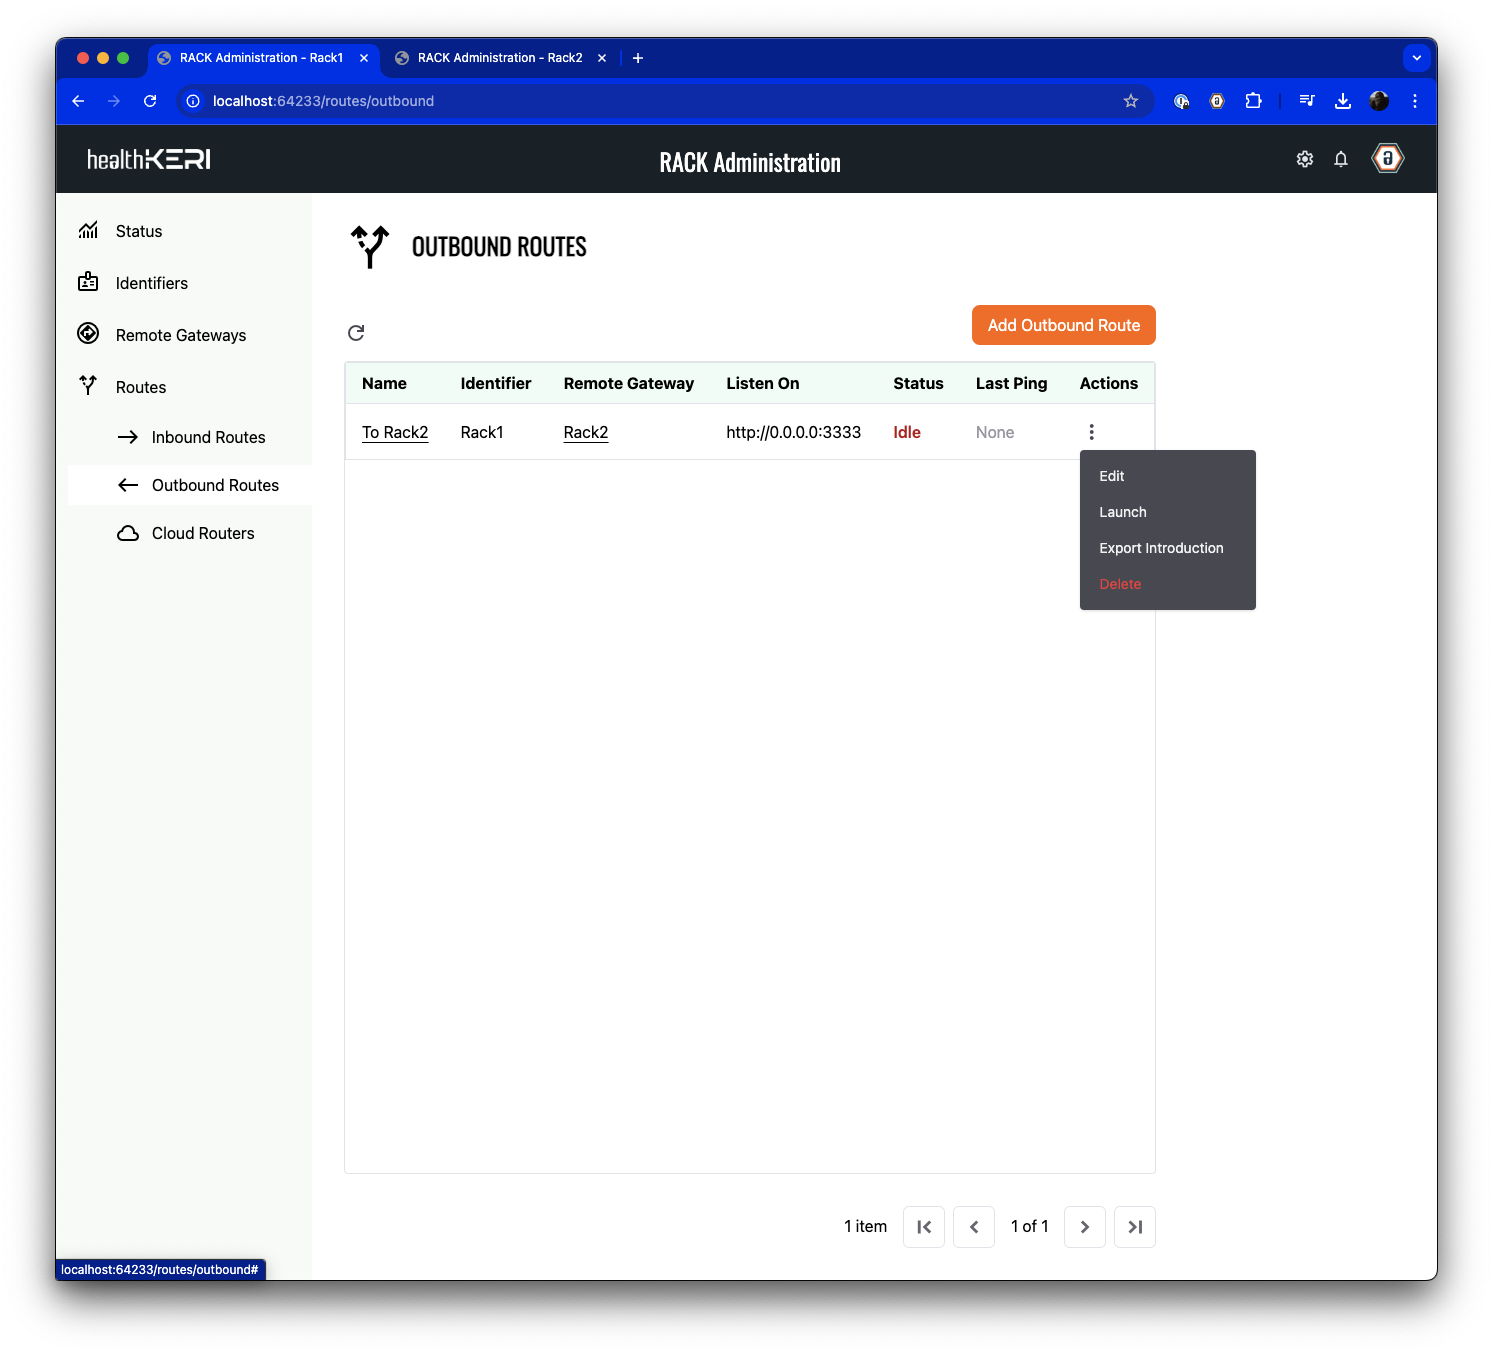 Perform the same operation on the inbound route in the **Inbound Routes** section of the **Rack2**
AUI.
Perform the same operation on the inbound route in the **Inbound Routes** section of the **Rack2**
AUI.
 Both gateways are now launched as indicated by their status changing from **Idle** to **Running**.
After one minute, the **Last Ping** value in each route will be updated with a timestamp indicating the gateways are now connected and able to exchange secure data.
You have now completed the configuration of two RACK gateways and can exchange secure data! See the following network diagram for details.
Both gateways are now launched as indicated by their status changing from **Idle** to **Running**.
After one minute, the **Last Ping** value in each route will be updated with a timestamp indicating the gateways are now connected and able to exchange secure data.
You have now completed the configuration of two RACK gateways and can exchange secure data! See the following network diagram for details.
 ## 7. Send Test Data
As mentioned previously, the Docker compose file launched in [Step 1](#1-launch-healthkeri-rack-and-mirth-connect) created 2 instances of Mirth Connect
and configured them with Channels that would send data through our newly configured RACK gateways.
**Mirth1** has a channel that is looking for any JSON files placed in its local `/opt/connect/data` directory (mapped to the `/examples/data/volumes/mirth1` directory by Docker compose).
When files show up in `/opt/connect/data`, **Mirth1** will send those files via HTTP to the IP address and Port that **Rack1** is now listening on.
To facilitate testing, we have provided 2 directories (`/examples/data/fhir-dataset` and `/examples/data/fhir-dataset-large`) of sample FHIR data files that can be used to test the new secure connection. We also included a Shell script that will copy the files into the correct local directory to be picked up by **Mirth1**.
To send test files through the secure connection, use the following command from the `/examples` directory:
```bash Load Test theme={null}
./load-test.sh fhir-dataset 50
```
This command will copy 50 random files from the `/examples/data/fhir-dataset` directory to the `/examples/data/volumes/mirth1` directory which will cause **Mirth1** to pick up those files and send them to **Rack1**
**Rack1** will, in turn, sign and encrypt every file (the entire HTTP transaction, as a matter of fact) and send the, now secured, data to **Rack2**, which will decrypt the data and recreate the HTTP transaction to send to **Mirth2**.
Logging was left at the **INFO** level so you will see a series of log statements from **Rack1** and **Rack2** indicating the successful flow of data, similar to the following:
```bash Rack theme={null}
rack-1-1 | 2025-02-17 18:33:12 [rack] INFO Behavior for /fwd missing or does not have verify for said=ENAjc5b0gQTJo_9LEk74ltUhiDVSsiqROsPXNZpZDses
rack-1-1 | 2025-02-17 18:33:12 [rack] INFO Message from EAVyvgXvjcYxBZYDtbxpEaX4F6RLuyhrw_aagZaq0iXt to EPTKEkkVw9XuCsMQ4rdqIyK8bQJQyGHWlAaWg09LuGo7
rack-1-1 | 2025-02-17 18:33:12 [rack] INFO tcp client cue received for evt=ENAjc5b0gQTJo_9LEk74ltUhiDVSsiqROsPXNZpZDses
rack-1-1 | 2025-02-17 18:33:12 [rack] INFO tcp -> [EGVh6SBUMqWEsy5FSm2H4anB8OI4HdF70rtQxru_m6Hx]/[EMfZQm1_0YS6chhM6rV1jhC7Dwh5wBdQc0TpnpYaW6Er] -> dessr: msg recv.
rack-1-1 | 2025-02-17 18:33:12 [rack] INFO tcp -> [EGVh6SBUMqWEsy5FSm2H4anB8OI4HdF70rtQxru_m6Hx]/[EMfZQm1_0YS6chhM6rV1jhC7Dwh5wBdQc0TpnpYaW6Er] -> dessr: msg sent.
rack-1-1 | 2025-02-17 18:33:12 [rack] INFO Behavior for /essr/req missing or does not have verify for said=ED7e1Xs8MijyMnh_sF2TefIRQYwePUOFRKF4W4enacCm
rack-1-1 | 2025-02-17 18:33:12 [rack] INFO dessr -> [EGVh6SBUMqWEsy5FSm2H4anB8OI4HdF70rtQxru_m6Hx]/[EMfZQm1_0YS6chhM6rV1jhC7Dwh5wBdQc0TpnpYaW6Er] -> httpsrv: msg recv.
rack-1-1 | 2025-02-17 18:33:12 [rack] INFO dessr -> [EGVh6SBUMqWEsy5FSm2H4anB8OI4HdF70rtQxru_m6Hx]/[EMfZQm1_0YS6chhM6rV1jhC7Dwh5wBdQc0TpnpYaW6Er] -> httpsrv: msg sent.
rack-1-1 | 2025-02-17 18:33:12 [rack] INFO Behavior for /http/rep missing or does not have verify for said=EHfg2cuhkXV0F3G8MoHi0CjBvyHXCjlZ_wHEsRBc-XFc
rack-1-1 | 2025-02-17 18:33:12 [rack] INFO httpsrv sending 0 bytes for EAG3nLVV1uTw6zErIY2tYrw3qtMw1kj7g4N78C655dkd
rack-2-1 | 2025-02-17 18:33:12 [rack] INFO Behavior for /fwd missing or does not have verify for said=ECsNTwvaF5GccfgyF3jOkJK52mBHX2xGj8M0S97hlUMO
rack-2-1 | 2025-02-17 18:33:12 [rack] INFO Message from EK4iFDRWMPH2mJ_VSJZt5VgCTg7wupzKX5nipreSOBuR to EJ8Rx6lal6S7mlrhp6OuHkxAizP7N5ufzllu4YIbjjvV
rack-2-1 | 2025-02-17 18:33:12 [rack] INFO exn with said=ECsNTwvaF5GccfgyF3jOkJK52mBHX2xGj8M0S97hlUMO saved
rack-2-1 | 2025-02-17 18:33:12 [rack] INFO Server core: sent response protocol messages: 487
rack-2-1 | 2025-02-17 18:33:12 [rack] INFO tcpsrv -> [EK4iFDRWMPH2mJ_VSJZt5VgCTg7wupzKX5nipreSOBuR]/[EJ8Rx6lal6S7mlrhp6OuHkxAizP7N5ufzllu4YIbjjvV] -> dessr: msg recv.
rack-2-1 | 2025-02-17 18:33:12 [rack] INFO tcpsrv -> [EK4iFDRWMPH2mJ_VSJZt5VgCTg7wupzKX5nipreSOBuR]/[EJ8Rx6lal6S7mlrhp6OuHkxAizP7N5ufzllu4YIbjjvV] -> dessr: msg sent.
rack-2-1 | 2025-02-17 18:33:12 [rack] INFO Behavior for /essr/req missing or does not have verify for said=EPCBtqy5MsjRMV7-55Qv3MNxOgyhrMrH25C9yWRHIAaf
rack-2-1 | 2025-02-17 18:33:12 [rack] INFO dessr -> [EK4iFDRWMPH2mJ_VSJZt5VgCTg7wupzKX5nipreSOBuR]/[EJ8Rx6lal6S7mlrhp6OuHkxAizP7N5ufzllu4YIbjjvV] -> httpcall: msg recv.
rack-2-1 | 2025-02-17 18:33:12 [rack] INFO dessr -> [EK4iFDRWMPH2mJ_VSJZt5VgCTg7wupzKX5nipreSOBuR]/[EJ8Rx6lal6S7mlrhp6OuHkxAizP7N5ufzllu4YIbjjvV] -> httpcall: msg sent.
rack-2-1 | 2025-02-17 18:33:12 [rack] INFO Behavior for /ping missing or does not have verify for said=EEKa6p_xmPN8Hzeerls_NoDufr5cdNH2NkyAnlw44twL
rack-2-1 | 2025-02-17 18:33:12 [rack] INFO Behavior for /ping missing or does not have handle for said=EEKa6p_xmPN8Hzeerls_NoDufr5cdNH2NkyAnlw44twL
```
You have sent fully secure data in **Zero-Trust** between two Mirth Connect integrations instances without SSL!
## 8. Verify Results
The **Mirth2** instance is configured to write the files it receives from **Rack1** to its `/opt/connect/data` directory (mapped to `/examples/data/volumes/mirth2` by Docker compose). To verify that the data flowed successfully through all 4 containers, you can check for new files that will now be in `/examples/data/volumes/mirth2`:
````bash examples/data/volumes/mirth2 theme={null}
ls -a ./examples/data/volumes/mirth2
data/volumes/mirth2/1739817190096.dat-1739817190096-signed.json data/volumes/mirth2/1739817191043.dat-1739817191043-signed.json data/volumes/mirth2/1739817191876.dat-1739817191876-signed.json
data/volumes/mirth2/1739817190166.dat-1739817190166-signed.json data/volumes/mirth2/1739817191091.dat-1739817191091-signed.json data/volumes/mirth2/1739817191925.dat-1739817191925-signed.json
data/volumes/mirth2/1739817190226.dat-1739817190226-signed.json data/volumes/mirth2/1739817191136.dat-1739817191136-signed.json data/volumes/mirth2/1739817191968.dat-1739817191968-signed.json
data/volumes/mirth2/1739817190266.dat-1739817190266-signed.json data/volumes/mirth2/1739817191175.dat-1739817191175-signed.json data/volumes/mirth2/1739817192010.dat-1739817192010-signed.json
data/volumes/mirth2/1739817190315.dat-1739817190315-signed.json data/volumes/mirth2/1739817191225.dat-1739817191225-signed.json data/volumes/mirth2/1739817192057.dat-1739817192057-signed.json
data/volumes/mirth2/1739817190370.dat-1739817190370-signed.json data/volumes/mirth2/1739817191281.dat-1739817191281-signed.json data/volumes/mirth2/1739817192103.dat-1739817192103-signed.json
data/volumes/mirth2/1739817190416.dat-1739817190416-signed.json data/volumes/mirth2/1739817191338.dat-1739817191338-signed.json data/volumes/mirth2/1739817192151.dat-1739817192151-signed.json
data/volumes/mirth2/1739817190469.dat-1739817190469-signed.json data/volumes/mirth2/1739817191388.dat-1739817191388-signed.json data/volumes/mirth2/1739817192194.dat-1739817192194-signed.json
data/volumes/mirth2/1739817190528.dat-1739817190528-signed.json data/volumes/mirth2/1739817191440.dat-1739817191440-signed.json data/volumes/mirth2/1739817192236.dat-1739817192236-signed.json
data/volumes/mirth2/1739817190584.dat-1739817190584-signed.json data/volumes/mirth2/1739817191488.dat-1739817191488-signed.json data/volumes/mirth2/1739817192276.dat-1739817192276-signed.json
data/volumes/mirth2/1739817190640.dat-1739817190640-signed.json data/volumes/mirth2/1739817191535.dat-1739817191535-signed.json data/volumes/mirth2/1739817192318.dat-1739817192318-signed.json
data/volumes/mirth2/1739817190697.dat-1739817190697-signed.json data/volumes/mirth2/1739817191588.dat-1739817191588-signed.json data/volumes/mirth2/1739817192367.dat-1739817192367-signed.json
data/volumes/mirth2/1739817190755.dat-1739817190755-signed.json data/volumes/mirth2/1739817191636.dat-1739817191636-signed.json data/volumes/mirth2/1739817192416.dat-1739817192416-signed.json
data/volumes/mirth2/1739817190826.dat-1739817190826-signed.json data/volumes/mirth2/1739817191682.dat-1739817191682-signed.json data/volumes/mirth2/1739817192471.dat-1739817192471-signed.json
data/volumes/mirth2/1739817190880.dat-1739817190880-signed.json data/volumes/mirth2/1739817191726.dat-1739817191726-signed.json data/volumes/mirth2/1739817192523.dat-1739817192523-signed.json
data/volumes/mirth2/1739817190935.dat-1739817190935-signed.json data/volumes/mirth2/1739817191769.dat-1739817191769-signed.json data/volumes/mirth2/1739817192562.dat-1739817192562-signed.json
data/volumes/mirth2/1739817190990.dat-1739817190990-signed.json data/volumes/mirth2/1739817191820.dat-1739817191820-signed.json```
````
You can also diff those files to see that the full FHIR records have been transferred completely.
If you would like to verify that only signed and encrypted data was sent between the RACK gateways, we recommend adding a [Wireshark](https://hub.docker.com/r/linuxserver/wireshark) container to the `mirth-connect-rack-compose-sample.yaml` Docker compose file to analyze the network traffic between the `172.31.0.4` and `172.31.0.5` IP addresses.
## 9. Next Steps
Now that you've connected two RACK gateways directly via a Peer-To-Peer connection, you should see one main limitation with this configuration.
At least one gateway will have to listen for incoming connections on a TCP port. While this may be fine for local testing it can be challenging to test gateways on the Open Internet.
In our next tutorial, we will be demonstrating how to connect two RACK gateways using [healthKERI](https://healthKERI.com) Cloud Routers to remove this limitation.
Stay tuned for our next walkthrough. For questions or inquiries, contact [info@healthkeri.com](mailto:info@healthkeri.com).
## 7. Send Test Data
As mentioned previously, the Docker compose file launched in [Step 1](#1-launch-healthkeri-rack-and-mirth-connect) created 2 instances of Mirth Connect
and configured them with Channels that would send data through our newly configured RACK gateways.
**Mirth1** has a channel that is looking for any JSON files placed in its local `/opt/connect/data` directory (mapped to the `/examples/data/volumes/mirth1` directory by Docker compose).
When files show up in `/opt/connect/data`, **Mirth1** will send those files via HTTP to the IP address and Port that **Rack1** is now listening on.
To facilitate testing, we have provided 2 directories (`/examples/data/fhir-dataset` and `/examples/data/fhir-dataset-large`) of sample FHIR data files that can be used to test the new secure connection. We also included a Shell script that will copy the files into the correct local directory to be picked up by **Mirth1**.
To send test files through the secure connection, use the following command from the `/examples` directory:
```bash Load Test theme={null}
./load-test.sh fhir-dataset 50
```
This command will copy 50 random files from the `/examples/data/fhir-dataset` directory to the `/examples/data/volumes/mirth1` directory which will cause **Mirth1** to pick up those files and send them to **Rack1**
**Rack1** will, in turn, sign and encrypt every file (the entire HTTP transaction, as a matter of fact) and send the, now secured, data to **Rack2**, which will decrypt the data and recreate the HTTP transaction to send to **Mirth2**.
Logging was left at the **INFO** level so you will see a series of log statements from **Rack1** and **Rack2** indicating the successful flow of data, similar to the following:
```bash Rack theme={null}
rack-1-1 | 2025-02-17 18:33:12 [rack] INFO Behavior for /fwd missing or does not have verify for said=ENAjc5b0gQTJo_9LEk74ltUhiDVSsiqROsPXNZpZDses
rack-1-1 | 2025-02-17 18:33:12 [rack] INFO Message from EAVyvgXvjcYxBZYDtbxpEaX4F6RLuyhrw_aagZaq0iXt to EPTKEkkVw9XuCsMQ4rdqIyK8bQJQyGHWlAaWg09LuGo7
rack-1-1 | 2025-02-17 18:33:12 [rack] INFO tcp client cue received for evt=ENAjc5b0gQTJo_9LEk74ltUhiDVSsiqROsPXNZpZDses
rack-1-1 | 2025-02-17 18:33:12 [rack] INFO tcp -> [EGVh6SBUMqWEsy5FSm2H4anB8OI4HdF70rtQxru_m6Hx]/[EMfZQm1_0YS6chhM6rV1jhC7Dwh5wBdQc0TpnpYaW6Er] -> dessr: msg recv.
rack-1-1 | 2025-02-17 18:33:12 [rack] INFO tcp -> [EGVh6SBUMqWEsy5FSm2H4anB8OI4HdF70rtQxru_m6Hx]/[EMfZQm1_0YS6chhM6rV1jhC7Dwh5wBdQc0TpnpYaW6Er] -> dessr: msg sent.
rack-1-1 | 2025-02-17 18:33:12 [rack] INFO Behavior for /essr/req missing or does not have verify for said=ED7e1Xs8MijyMnh_sF2TefIRQYwePUOFRKF4W4enacCm
rack-1-1 | 2025-02-17 18:33:12 [rack] INFO dessr -> [EGVh6SBUMqWEsy5FSm2H4anB8OI4HdF70rtQxru_m6Hx]/[EMfZQm1_0YS6chhM6rV1jhC7Dwh5wBdQc0TpnpYaW6Er] -> httpsrv: msg recv.
rack-1-1 | 2025-02-17 18:33:12 [rack] INFO dessr -> [EGVh6SBUMqWEsy5FSm2H4anB8OI4HdF70rtQxru_m6Hx]/[EMfZQm1_0YS6chhM6rV1jhC7Dwh5wBdQc0TpnpYaW6Er] -> httpsrv: msg sent.
rack-1-1 | 2025-02-17 18:33:12 [rack] INFO Behavior for /http/rep missing or does not have verify for said=EHfg2cuhkXV0F3G8MoHi0CjBvyHXCjlZ_wHEsRBc-XFc
rack-1-1 | 2025-02-17 18:33:12 [rack] INFO httpsrv sending 0 bytes for EAG3nLVV1uTw6zErIY2tYrw3qtMw1kj7g4N78C655dkd
rack-2-1 | 2025-02-17 18:33:12 [rack] INFO Behavior for /fwd missing or does not have verify for said=ECsNTwvaF5GccfgyF3jOkJK52mBHX2xGj8M0S97hlUMO
rack-2-1 | 2025-02-17 18:33:12 [rack] INFO Message from EK4iFDRWMPH2mJ_VSJZt5VgCTg7wupzKX5nipreSOBuR to EJ8Rx6lal6S7mlrhp6OuHkxAizP7N5ufzllu4YIbjjvV
rack-2-1 | 2025-02-17 18:33:12 [rack] INFO exn with said=ECsNTwvaF5GccfgyF3jOkJK52mBHX2xGj8M0S97hlUMO saved
rack-2-1 | 2025-02-17 18:33:12 [rack] INFO Server core: sent response protocol messages: 487
rack-2-1 | 2025-02-17 18:33:12 [rack] INFO tcpsrv -> [EK4iFDRWMPH2mJ_VSJZt5VgCTg7wupzKX5nipreSOBuR]/[EJ8Rx6lal6S7mlrhp6OuHkxAizP7N5ufzllu4YIbjjvV] -> dessr: msg recv.
rack-2-1 | 2025-02-17 18:33:12 [rack] INFO tcpsrv -> [EK4iFDRWMPH2mJ_VSJZt5VgCTg7wupzKX5nipreSOBuR]/[EJ8Rx6lal6S7mlrhp6OuHkxAizP7N5ufzllu4YIbjjvV] -> dessr: msg sent.
rack-2-1 | 2025-02-17 18:33:12 [rack] INFO Behavior for /essr/req missing or does not have verify for said=EPCBtqy5MsjRMV7-55Qv3MNxOgyhrMrH25C9yWRHIAaf
rack-2-1 | 2025-02-17 18:33:12 [rack] INFO dessr -> [EK4iFDRWMPH2mJ_VSJZt5VgCTg7wupzKX5nipreSOBuR]/[EJ8Rx6lal6S7mlrhp6OuHkxAizP7N5ufzllu4YIbjjvV] -> httpcall: msg recv.
rack-2-1 | 2025-02-17 18:33:12 [rack] INFO dessr -> [EK4iFDRWMPH2mJ_VSJZt5VgCTg7wupzKX5nipreSOBuR]/[EJ8Rx6lal6S7mlrhp6OuHkxAizP7N5ufzllu4YIbjjvV] -> httpcall: msg sent.
rack-2-1 | 2025-02-17 18:33:12 [rack] INFO Behavior for /ping missing or does not have verify for said=EEKa6p_xmPN8Hzeerls_NoDufr5cdNH2NkyAnlw44twL
rack-2-1 | 2025-02-17 18:33:12 [rack] INFO Behavior for /ping missing or does not have handle for said=EEKa6p_xmPN8Hzeerls_NoDufr5cdNH2NkyAnlw44twL
```
You have sent fully secure data in **Zero-Trust** between two Mirth Connect integrations instances without SSL!
## 8. Verify Results
The **Mirth2** instance is configured to write the files it receives from **Rack1** to its `/opt/connect/data` directory (mapped to `/examples/data/volumes/mirth2` by Docker compose). To verify that the data flowed successfully through all 4 containers, you can check for new files that will now be in `/examples/data/volumes/mirth2`:
````bash examples/data/volumes/mirth2 theme={null}
ls -a ./examples/data/volumes/mirth2
data/volumes/mirth2/1739817190096.dat-1739817190096-signed.json data/volumes/mirth2/1739817191043.dat-1739817191043-signed.json data/volumes/mirth2/1739817191876.dat-1739817191876-signed.json
data/volumes/mirth2/1739817190166.dat-1739817190166-signed.json data/volumes/mirth2/1739817191091.dat-1739817191091-signed.json data/volumes/mirth2/1739817191925.dat-1739817191925-signed.json
data/volumes/mirth2/1739817190226.dat-1739817190226-signed.json data/volumes/mirth2/1739817191136.dat-1739817191136-signed.json data/volumes/mirth2/1739817191968.dat-1739817191968-signed.json
data/volumes/mirth2/1739817190266.dat-1739817190266-signed.json data/volumes/mirth2/1739817191175.dat-1739817191175-signed.json data/volumes/mirth2/1739817192010.dat-1739817192010-signed.json
data/volumes/mirth2/1739817190315.dat-1739817190315-signed.json data/volumes/mirth2/1739817191225.dat-1739817191225-signed.json data/volumes/mirth2/1739817192057.dat-1739817192057-signed.json
data/volumes/mirth2/1739817190370.dat-1739817190370-signed.json data/volumes/mirth2/1739817191281.dat-1739817191281-signed.json data/volumes/mirth2/1739817192103.dat-1739817192103-signed.json
data/volumes/mirth2/1739817190416.dat-1739817190416-signed.json data/volumes/mirth2/1739817191338.dat-1739817191338-signed.json data/volumes/mirth2/1739817192151.dat-1739817192151-signed.json
data/volumes/mirth2/1739817190469.dat-1739817190469-signed.json data/volumes/mirth2/1739817191388.dat-1739817191388-signed.json data/volumes/mirth2/1739817192194.dat-1739817192194-signed.json
data/volumes/mirth2/1739817190528.dat-1739817190528-signed.json data/volumes/mirth2/1739817191440.dat-1739817191440-signed.json data/volumes/mirth2/1739817192236.dat-1739817192236-signed.json
data/volumes/mirth2/1739817190584.dat-1739817190584-signed.json data/volumes/mirth2/1739817191488.dat-1739817191488-signed.json data/volumes/mirth2/1739817192276.dat-1739817192276-signed.json
data/volumes/mirth2/1739817190640.dat-1739817190640-signed.json data/volumes/mirth2/1739817191535.dat-1739817191535-signed.json data/volumes/mirth2/1739817192318.dat-1739817192318-signed.json
data/volumes/mirth2/1739817190697.dat-1739817190697-signed.json data/volumes/mirth2/1739817191588.dat-1739817191588-signed.json data/volumes/mirth2/1739817192367.dat-1739817192367-signed.json
data/volumes/mirth2/1739817190755.dat-1739817190755-signed.json data/volumes/mirth2/1739817191636.dat-1739817191636-signed.json data/volumes/mirth2/1739817192416.dat-1739817192416-signed.json
data/volumes/mirth2/1739817190826.dat-1739817190826-signed.json data/volumes/mirth2/1739817191682.dat-1739817191682-signed.json data/volumes/mirth2/1739817192471.dat-1739817192471-signed.json
data/volumes/mirth2/1739817190880.dat-1739817190880-signed.json data/volumes/mirth2/1739817191726.dat-1739817191726-signed.json data/volumes/mirth2/1739817192523.dat-1739817192523-signed.json
data/volumes/mirth2/1739817190935.dat-1739817190935-signed.json data/volumes/mirth2/1739817191769.dat-1739817191769-signed.json data/volumes/mirth2/1739817192562.dat-1739817192562-signed.json
data/volumes/mirth2/1739817190990.dat-1739817190990-signed.json data/volumes/mirth2/1739817191820.dat-1739817191820-signed.json```
````
You can also diff those files to see that the full FHIR records have been transferred completely.
If you would like to verify that only signed and encrypted data was sent between the RACK gateways, we recommend adding a [Wireshark](https://hub.docker.com/r/linuxserver/wireshark) container to the `mirth-connect-rack-compose-sample.yaml` Docker compose file to analyze the network traffic between the `172.31.0.4` and `172.31.0.5` IP addresses.
## 9. Next Steps
Now that you've connected two RACK gateways directly via a Peer-To-Peer connection, you should see one main limitation with this configuration.
At least one gateway will have to listen for incoming connections on a TCP port. While this may be fine for local testing it can be challenging to test gateways on the Open Internet.
In our next tutorial, we will be demonstrating how to connect two RACK gateways using [healthKERI](https://healthKERI.com) Cloud Routers to remove this limitation.
Stay tuned for our next walkthrough. For questions or inquiries, contact [info@healthkeri.com](mailto:info@healthkeri.com).